• There has been a recent cluster of spammers accessing BARFer accounts and posting spam. To safeguard your account, please consider changing your password. It would be even better to take the additional step of enabling 2 Factor Authentication (2FA) on your BARF account. Read more here.

First attempt at vac bagging:

Cracker Red

New member
Joined
Jul 5, 2008
Location
GA
Moto(s)
Ducati
Well, I've been lurking here for some time, reading about the amazing mythical feats of Tygaboy and his carbon.

So, I used to build CF wings for sailplanes a LONG time ago. Vac bagger was still in a box, along with a bunch of other stuff. Time to order up some cloth, and start tearing up perfectly good stock parts to try and make some bling:

DSC_0335.jpg


Monster headlight mounts:
MonsterHeadlightbracketRed1.jpg

MonsterHeadlightbracketRed2.jpg


Monster heel gaurd:

I was in a hurry, didn't get the bubbles squeezed out. Failed attempt #1.

Monsterheelguard.jpg


I havn't been using an PVA, and I'm wondering why there are some dry spots on my layups. Could it be because I'm so rusty I just forgot to use any PVA, and the wax is forcing out the resin?

DSC_0337.jpg


One question for Chris if he's out there. The headlight brackets I copied are to flimsy....need another few layers really. Could I just lay them up again in the vac bagger? I don't see why not, but I figured I'd ask first.


Obviously all parts need to be sanded/cleared/polished. Not to bad for my first few attempts. Hopefully next time I use the PVA and I won't need to clear anything, just sport that satin "race-sheen" action.
 
Also, in the bag are a pair of master cylinder resivior mounts. I tried 3 layers, and it's waaaaay to floppy.

I know carbon doesn't like 90 deg bends, I was thinking of something fluid and one curved shape.

I swear I saw a mount like that on this site before, but I can't find it.....anyone know where it might be?
 
book of the month club :thumbup... right on ;)

nice parts by the way. i was thinking of trying to do some of my own cf parts but i totally lack the time and resources right now. hopefully soon ill get a chance. everything looks good so far.
 
Last edited:
I have found that if the vacuum pressure is set too high it will squeeze the resins out in the high spots (don't know if that makes sense) also if there is a leak in the dumdum (sp) you get little jets that will suck out the resins and leave holidays
 
book of the month club :thumbup... right on ;)

Ha ha, I was going to make a smart ass remark about that.

Looks like you're on the right track, I'd love to learn that someday!
 
about teh floppiness:
what resins are you using? poly? epoxy? how did you mix it? how did you measure it? are you baking it?

and you probably need more layers for a super rigid part

for the bubbles/holidays/dry spots: controlling the vacuum is critical, get a vac gauge, and try not to let it get over 12" , as was mentioned above you can easily over vac/squeeze and force out too much resin.


but your parts look good, nice and clean.

I sometimes will use a poly casting resin (clear-lite etc,...) and DIP the finished parts instead of clearcoating AND RM now makes a CLEAR EPOXY PRIMER (which is just crazy cool when you think about it) which would be awesome for parts like these under a traditional urethane clearcoat. (it even comes in the new "aero-max" aerosol line)

nice stuff tho dude, keep at it.
 
Last edited:
I have been using either west systems with the medium hardener, or some stuff I found off ebay thats supposed to be good.

Measuring in a mixing cup, then confirming on a grams scale

Not baking it, although any more info on that would be great! Seems like it will take 2-3 days before it fully "sets up". It's never sticky/tacky though.

Even better would be more info on the dipping you speak of.

Could I give you a ring and bug you?

Thanks!

first off, my mistake on the vacuum meaurement, the "mm/hg" SHOULD read inches, so 12 to 15 inches of vacuum is all I ever pulled when fabbing a resin layup, but I never made anything smaller than a cafe fairing so maybe smaller parts in a big bag like that need more pull (would make sense), just not TOO much vac.

as far as the baking, it's easy as all hell, just get a cooler (like for keeping drinks cold) and then place a warming/heating pad in the bottom. (walgreen's=$15)
you can get all custom and drill a hole in the side to run the cord out and seal it with a grommet and silicone, or just flop it out the top. I use a probe type thermometer I got at harbor freight and running the pad at medium heat with the lid closed got the temp up to 150 degrees which will bake epoxy and poly resins just fine, leave em in for 8 to 12 hours.

ok resin dips:
if you ever made a fishing rod they don't spray the clear coat on them they dip and place on a rotating "lathe" of sorts, which slowly spins and keeps the resins thickness even while the part cures.
now for flat-ish parts like yours you can skip the rotating thingy, and just dip the parts in a catylized resin (like CLEAR-LITE and others at hobby shops or TAP) the advantage here is that the resin is thicker than most clearcoating substances, and fairly "thixotropic" (clings to vertical surfaces) so it levels out the rough spots (unless you have some major defects). once the part is dipped I'll hang it with a drip pad underneath it till it stops dripping, then with a hobby/art paintbrush I'll wipe off the little drop that remains (do this while the resin is still sort of wet), and then hang it suspended in the heat box and cook it for a few hours.
the casting resin should have heats and times on the label.

if you just took a CF part and tried spraying clearcoat on it, it takes like a gabillion and four coats till you get the texture of the weave out of the glossy surface, thats why I also mentioned the clear primer from RM.

you can also brush or spray the first coat of resin ON THE MOLD, let it set slightly, and then do the layup, vac bag, and bake, then your surface will be smoother and you can just spray on the clear of your choice and sometimes if your mold is polished out very very well, you can just pull the part, trim the flash, give the edges and surface a light buff and it's ready.

so you see you have a like a million choices in how to get a strong, functional, and PRETTY part.

the "pretty" isn't really needed, but still looks cool enough to go through the trouble.
 
Last edited:
On the flimsy headlight brackets, you can go back and add more layers - it's a "secondary" bond, that all. Not as ideal as an "all at once setup", but prep the surface and add the layers. I've done it a number of times and you should be fine.
 
I am exploring some UV safe resins this has always been my downfall on unpainted parts
Does any one have any experience? I am also a West systems user but am beginning to question my loyalty I know Smith's has some pretty good products.
 
On the flimsy headlight brackets, you can go back and add more layers - it's a "secondary" bond, that all. Not as ideal as an "all at once setup", but prep the surface and add the layers. I've done it a number of times and you should be fine.

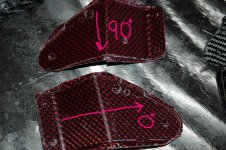
if the additional layers are unidriectional material (aka Uni) you'll get a greater increase in stiffness per thickness compared to the woven material already used. the continuous fibers would be applied parallel to the longest dimension of the bracket ( 0 degree in the picture)

the fibers in the 90 degree direction aren't doing much for stiffness, though they are keeping the part from cracking down the 0 direction
 

Attachments

  • MonsterHeadlightbracketRed1_markup.jpg
    MonsterHeadlightbracketRed1_markup.jpg
    144.2 KB · Views: 27
Hmm, I'll try that. I do have some uni laying around somewhere.


OK, well, I still need some help.

I got the exhaust guard to turn out without large voids in the resin, however I've got 3 spots now that have tiny tiny bubbles.

Not sure what I'm doing wrong, but any advice would be helpful. Here is my "process"

Wax the part with mold release wax - let dry/buff
wipe on PVA - let dry

cut out pieces of carbon to size
cut out breather and peel ply to size as well

mix up the epoxy. I stir for 4-5 mins, pour into another cup, stir, and then pour back in the first cup and stir some more.

I'll liberally brush on a coat of epoxy to the part first. Then I'll wet out the fabric on the table, and roll it to make sure it's throughly wet. Place the cloth in the mold/part, and brush it around. I will trace the outline of the part with my finger to make sure there are no bubbles/pockets in there.

I do this with the second and third layers as well.

FInally, in the bag it goes, squeezed to 12" last time.

Pulled them out this AM when they were still green to trim. Like I said, no voids, but tiny bubbles make the part ugly.

Sucks seeing seven of these nice looking things sitting here that I cant use, but I'm not going to let this crap beat me!
 
Give this a try:
Prep the mold with a good waxing/wiping then apply the PVA and let it get nice and dry.
Mix up your epoxy. I wix mine for about 1 min and that's it. Yes, more may be better but so long as it's mixed, it's mixed.
Apply a coat of epoxy to the mold then let it sit for 10 mins or so.
Take clean brush (I use those cheapy ones from Home Depot), pull on the bristles over and over to be sure you remove any loose ones.
Then, gently and with only the weight of the brush, drag the brush across the surface of the epoxy to remove all the air bubbles. You'll do this for "a while". Drag, let it sit for a few mins so bubbles can work themselves to the surface. You can also poke at the bubbles with a pin.

Now the fun part: wait for the epoxy to start to set up... a little.
What you want is the expoxy to setup enough that you can touch it and leave a finger print but have none stick to your finger. You may want to prep a "test" part so you have a control environment and aren't messing with your production part.
Then, once the epoxy is set up like this, gently but firmly, press your first layer of dry fabric into this "clear gel coat". BE CAREFUL as you do not get to pull it off, move it around, etc. If you do, you pull this initial layer off the mold and you'll get voids, etc.
Once you have the layer pressed into the epoxy. go do something else while it cures a bit.
Come back in a couple hours and wet out the layer in the mold and add your remaning layers, let them cure, etc.
This appoach should give you a perfect, no pin hole result. And you don't even have to bag.

Again, this is just one approach to composite layup. Maybe it'll work for you, too.

Best of luck...
 
Thanks Chris! I'm going to go try that now, and I think that will work great on the flat parts for sure.

I saw the pics of the exhaust guard for the 999/749 you guys did....that is the part that is giving me fits. The pin-holes are located around the mounting bosses if that helps.

That one you took pics of turned out GREAT....If I could only do that :)
 
More thoughts....


I'm using a bag/tube from Aerospace Composites.

I'm wondering if the bag isn't stretching enough to put adequate pressure on the inside where these curves are.

I've ordered some of the stretchelon film that is supposed to have 400% more stretch than the bags I've been using.

I have to wait a week to see if it will work.
 
For those tougher contour items you can shave some foam blocks make sure there some mold release on it and get a more even pressure At first this may e labor intensive but you will quickly get a feel for shaving the right shape within about 5 passes
 
More thoughts....


I'm using a bag/tube from Aerospace Composites.

I'm wondering if the bag isn't stretching enough to put adequate pressure on the inside where these curves are.

I've ordered some of the stretchelon film that is supposed to have 400% more stretch than the bags I've been using.

I have to wait a week to see if it will work.

that's very possible. it's called bridging. you might also be able to alleviate the problem by gathering up a little ridge over the radius that will allow the bag to move. also, when you're drawing vacuum down push the bag into the corner before full vacuum is reached and the bag is essentially locked in place
 
Ok, parts in the bag tonight. Fingers crossed, Frampton and Dire straits were playing when I did the layup.

I made sure there was ample bag to press down on the part.

I did 2 simple parts, a flat one (headlight bracket), and the 999 heel guards.

I did notice at 15" of vac immediately after pulling vac, lots of tiny bubbles were around the edges of the part.

20 mins later most had seemed to dissipate.

I think part of the problem at least is the fact I have to put the parts in the bag. I'm using a "tube" bag, so it's only sealed on 2 ends. If I could just place the parts straight down, it might be easier. The stretchelon film will help me do this, will be here next week.

As you said above, I pressed the bag down into the corners of the part as the vac was applied, and made sure there was enough bag to pull it down.
 
I dunno if it was the extra bag that I made sure the part had, or the extra care I used when putting the parts in the bag.

They turned out pretty darn good (no pinholes/no bubbles)

One question about trimming.

What do you use to trim the edges of a kevlar part? I remember doing it with model airplane hinges, and the edges would fray and you'ld need to re-epoxy them where you trimmed.

I plan on clear-coating these with a good 2k clear to get "the look" from them.
 
Back
Top