S21FOLGORE
Member
This was originally written for Ducati Monster Forum.
It (the style) may not fit well into BARF crowd, but the info is probably useful for those who have dreaded hot spot problem.
================================================
How to solve the helmet hot spot (pressure point) problem
Some people are lucky.
“Helmet? Just about any manufacturer’s size M would fit me fine.”
I’ve heard (read) comment like that.
If you are one of those people, consider yourself being lucky.
I’m writing this for those who are feeling like “It’s virtually impossible to find the helmet that won’t give me a painful hot spot. Pretty much every helmet I have tried starts hurting after an hour or so ...”
I started wearing motorcycle helmet in the early 80s, and yes, in the past, I had always had hot spot problem, until I found out what was causing it.
Seriously, ill fitting helmet can make you feel like you are wearing medieval torture device.
Isn’t it nice if you can wear helmet for long hours continuously, without feeling pain, yet it (the helmet) doesn’t slip around on your head every time you do the head check?
Know your head size and shape(not just “round, intermediate, long oval ...”)
[/size]
“If you know the enemy and know yourself, you need not fear the result of a hundred battles. If you know yourself but not the enemy, for every victory gained you will also suffer a defeat. If you know neither the enemy nor yourself, you will succumb in every battle.”
― Sun Tzu(544BC - 496BC) , The Art of War
So, following one of the greatest strategist and philosopher, we are going to figure out about ourselves (our own head) and, ...
the enemy... the helmet hot spot (what it really is, and how it happens).
The very first thing you need to do is to know your own head size and shape, before start looking at bunch of helmet reviews at Revzilla and Webbikeworld.
When you look at the user review of the helmet on the net, some people say Helmet XXX runs small and some say opposite, some say helmet ZZZ is narrow and some say it’s round. This happens because a lot (if not all) of them actually don’t know the “real” shape of their head.
Majority of the people just “think” they have intermediate oval / neutral shape head.
The word “intermediate” , “neutral” is a very slippery word.
Some are roundish, some are more oval-ish, some have bump, some have large flat area (usually forehead or the back of the head), all these small things can cause painful hot spot.
Now, rather than writing down the long and tedious generic theories about helmet fitting, I will use my own head as an example, to demonstrate how to get rid of the painful hot spot.
That way, you probably understand better “how to” solve the problem.
Taking measurement
So, take a tape measure, and measure your head circumference size, like a picture below.
But, everyone knows this already, right?

Note.
It is better to have someone to take a measurement, than trying to do by yourself.
Take a few measurement, and use the largest one.
Next, take a measurement of your head, front to back, side to side, using something like this

That's called sculpture’s caliper. You can find them at your local art supply store.
(In case you can't find it locally, here's one of the example where you can buy things like this.
https://www.sculpturehouse.com/p-21-sculptors-aluminum-caliper-12.aspx)
Alternatively, you can use the closet door (sliding door). Lay down on the floor, place your head between the door and the frame.
(If you do this, be careful when to do it. Try not to be witnessed by your wife/husband, girlfriend/boyfriend. They may start worrying about you.)
Next, run your finger tips on your head, to see if there’s any irregular bumps, large flat area, corners, etc.
This step is very important.
In my own case, this is the main reason of having the hot spot even though I’m wearing the correct size, correct shaped helmet.
Head shape
These days, most everyone who sells the helmets knows that they come in different internal shapes.
(If they don’t know, or seems like they are not willing to spend some time with you, don’t buy from them.)
I assume, if you are reading this, you already did the homework and know about the basics,(long oval, intermediate oval, round, etc, etc), so I believe you are not trying to squeeze your long oval shaped head into the round helmet (or, the other way around.)
Thus, I’m not going to talk about those basic mistakes.
And, if you have the helmet with wrong internal shape, nothing really helps. You have to start with the helmet that has , at least, the internal shape that is close to your head.
One thing I would like to talk about the head / helmet internal shape, is that the vagueness of the term, such as “long oval”, “intermediate”, etc.
Take a look at the picture below.
fig.1
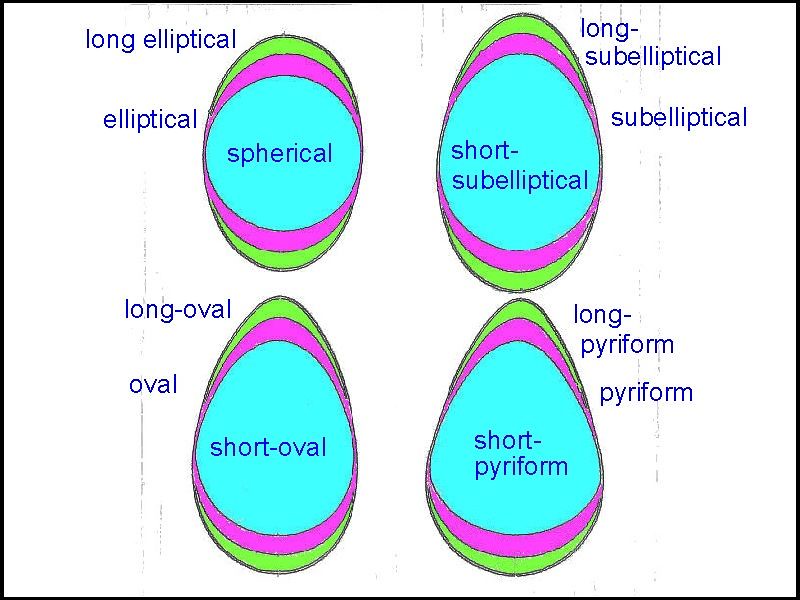
What people call “long oval head” is either “long elliptical” or “long sub-elliptical” head.
What referred as “intermediate” “neutral” is anywhere in between “elliptical” and “short-sub-elliptical”.
What called “round” is,... well, “spherical”.
Now, take a look at the measurement we took.
My own head measurements are
Circumference 56.5 cm
Width (Side to side) 17 cm
Length(Frond to back) 19 cm
Width (side-side) : length (front-back) ratio is 0.89 : 1. (I will talk about this later.)
Side to side measurement is about 10% shorter than front to back measurement.
Judging from these numbers,my head shape seems like so called “round-oval”.
The catch is, it is NOT.
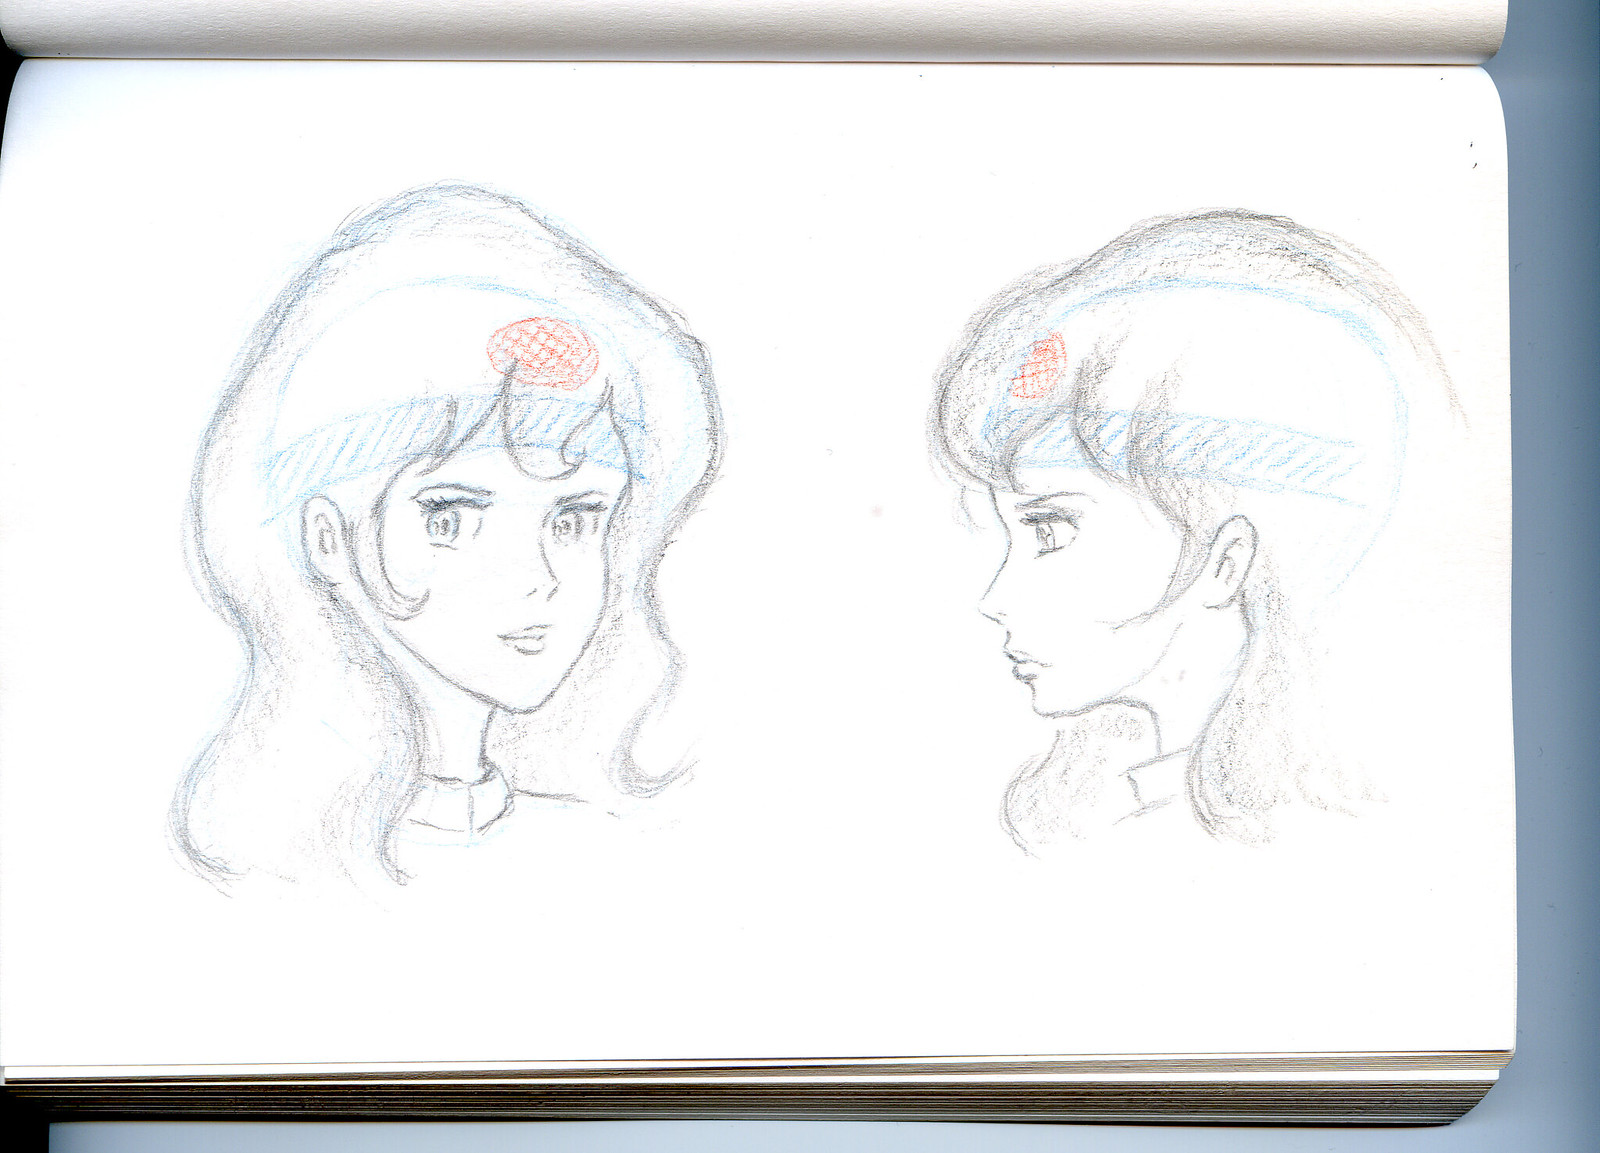
What these numbers don't tell you is that my head is pretty narrow at front(S size), the back side is a lot wider(M size or between M and L).
On top of that, my head has pointy corners at the top/back.
And that’s why lid-picker or helmet fitment data base on the internet (such as webbikeworld) never helped me.
Take a look at the picture below.
fig.2
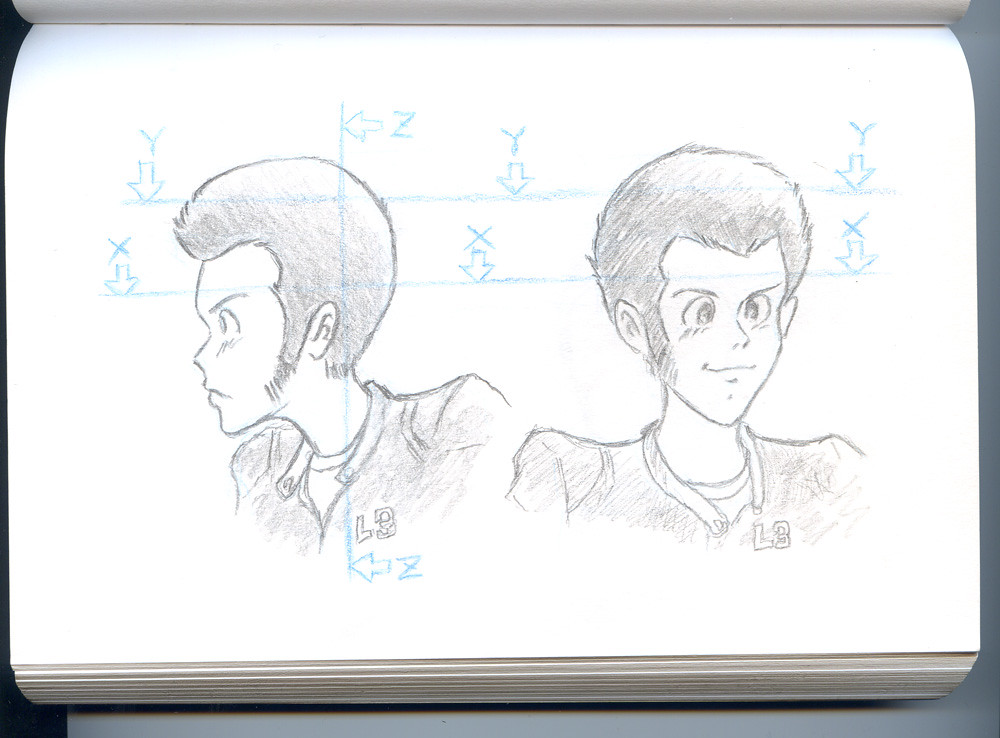
fig.3
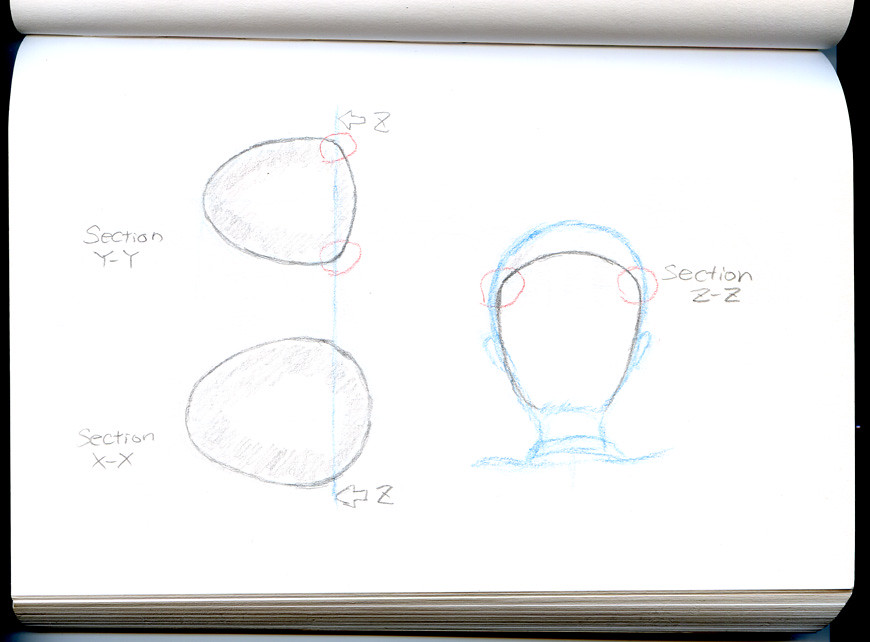
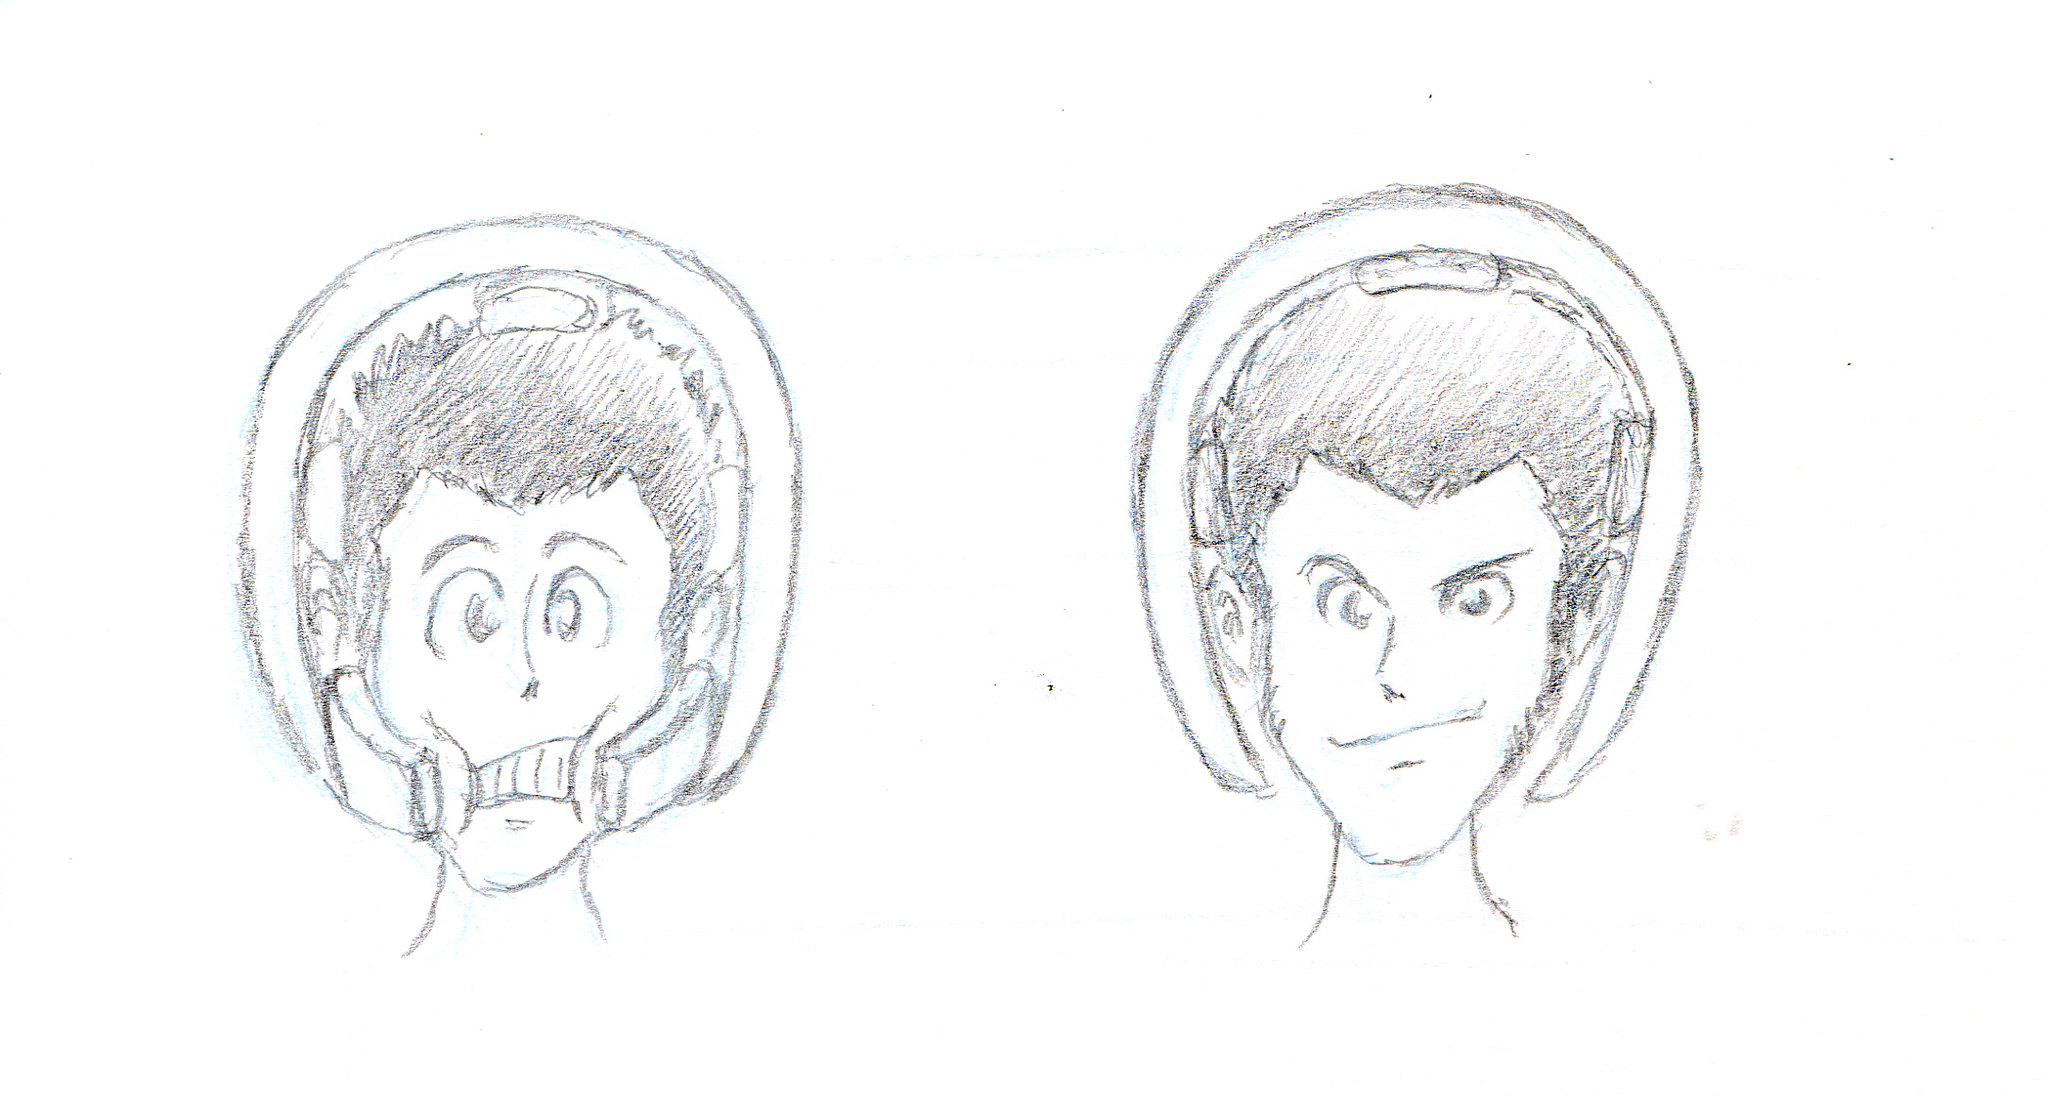
SO, my head at crown area (section X-X) is a “short, short sub-elliptical” head.
Widest part of the head is closer to the back of the head, rather than in the middle (around the ears, temple area), front half is smaller than the rear half, narrow at forehead area, wider at the back.
However, at section Y-Y, near the top of my head, it ends with square-ish corners at each side.
Looking at from the back (section Z-Z), it looks like I have square shaped head at the top.
(Note: Keep in mind, the shape in the drawing is exaggerated so that you can see it clearly.)
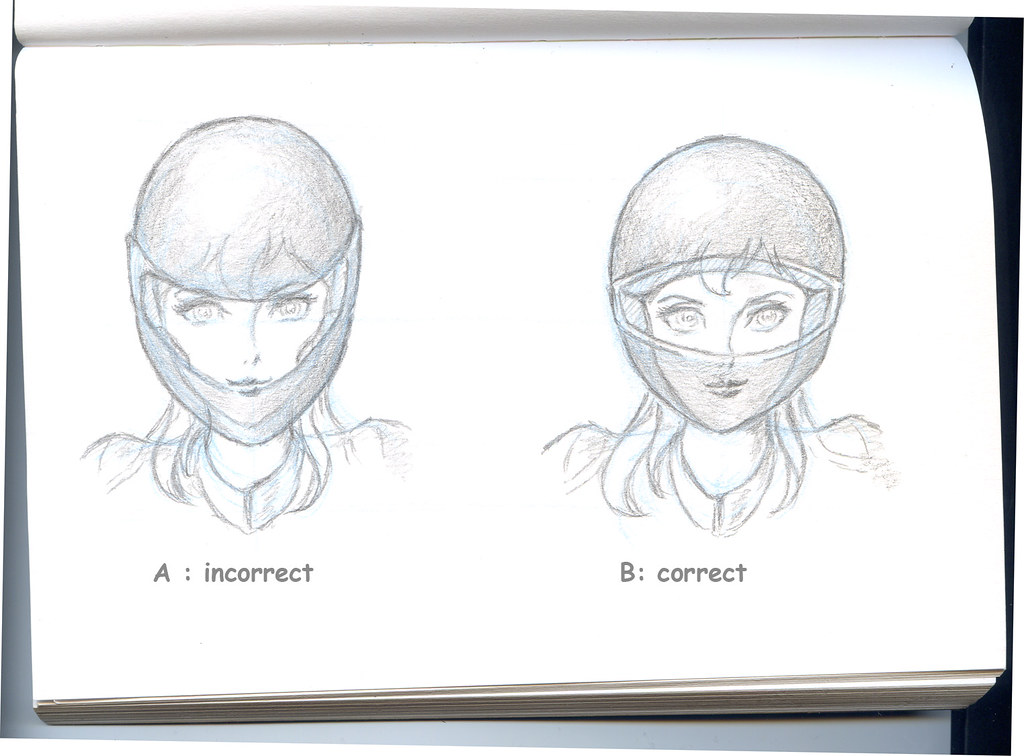
So, these pointy corners at the back of my head start hurting after an hour or so, because some of the weight of the helmet is on these two “points”, rather than evenly spread over the large surface area.
And, if I go up one size larger helmet, wrongly thinking that the pain comes from “too tight” fitting helmet, things get worse.
Because with the loose fitting, the crown area can no longer support the weight of the helmet, and all of the weight will be on three points, on top of the head and two corners at the end.
fig.4
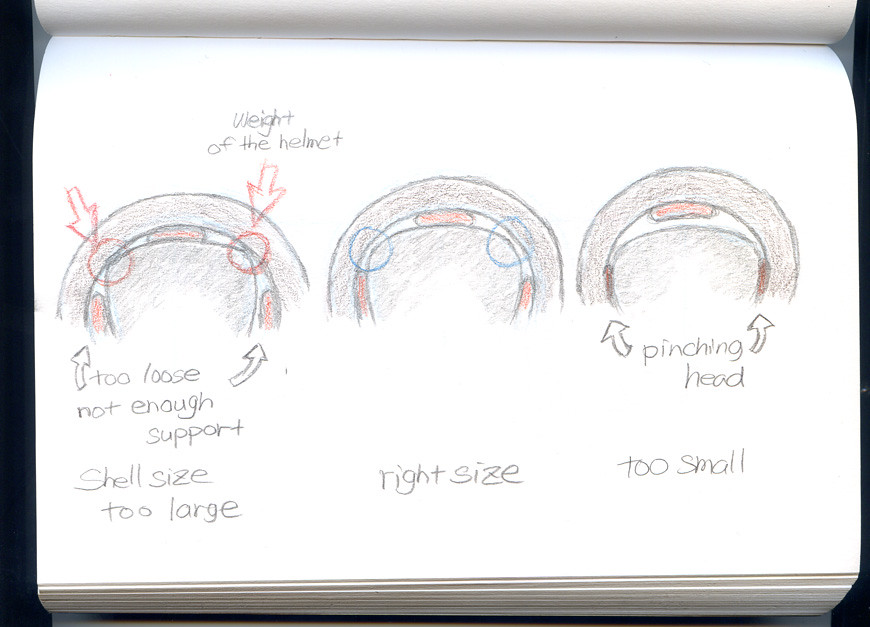
As you can see, too small helmet would be pinching the side of my head, and it becomes a torture device after an hour or so.
(And if I get stuck in the heavy traffic, it really is a torture.)
Unfortunately, there aren’t many helmets with egg shaped (narrow at front, wide at the back) internal.
Even if I wear right size, typical “round-oval” helmet still gives me hot spot after 45min to 1 hour.
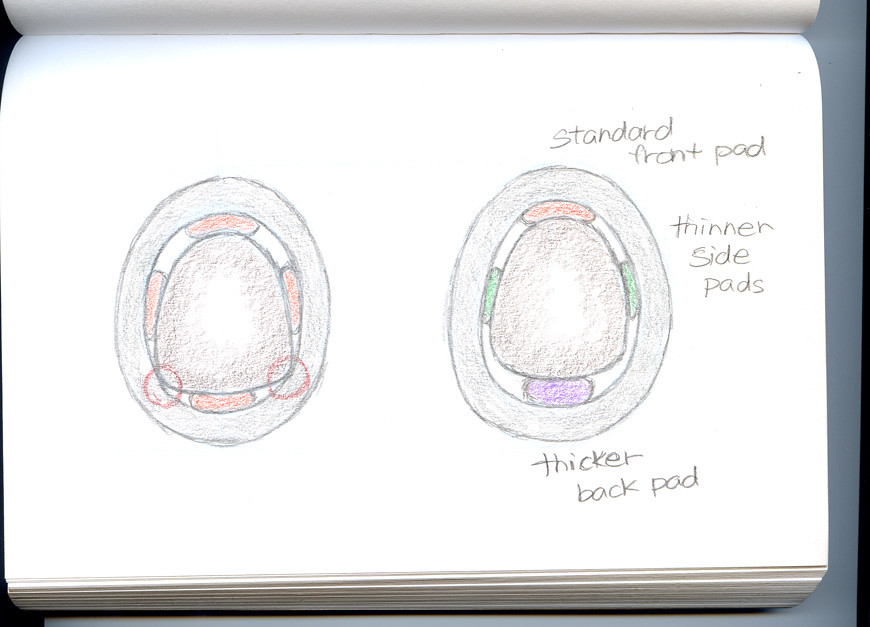
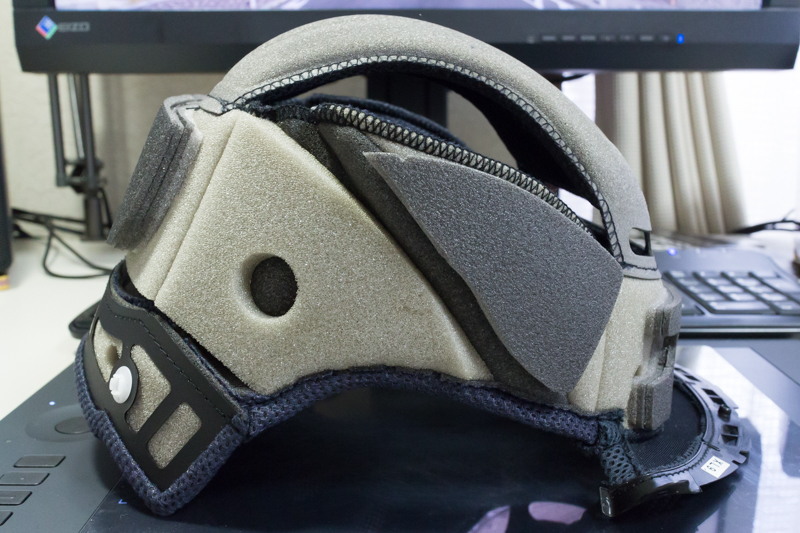
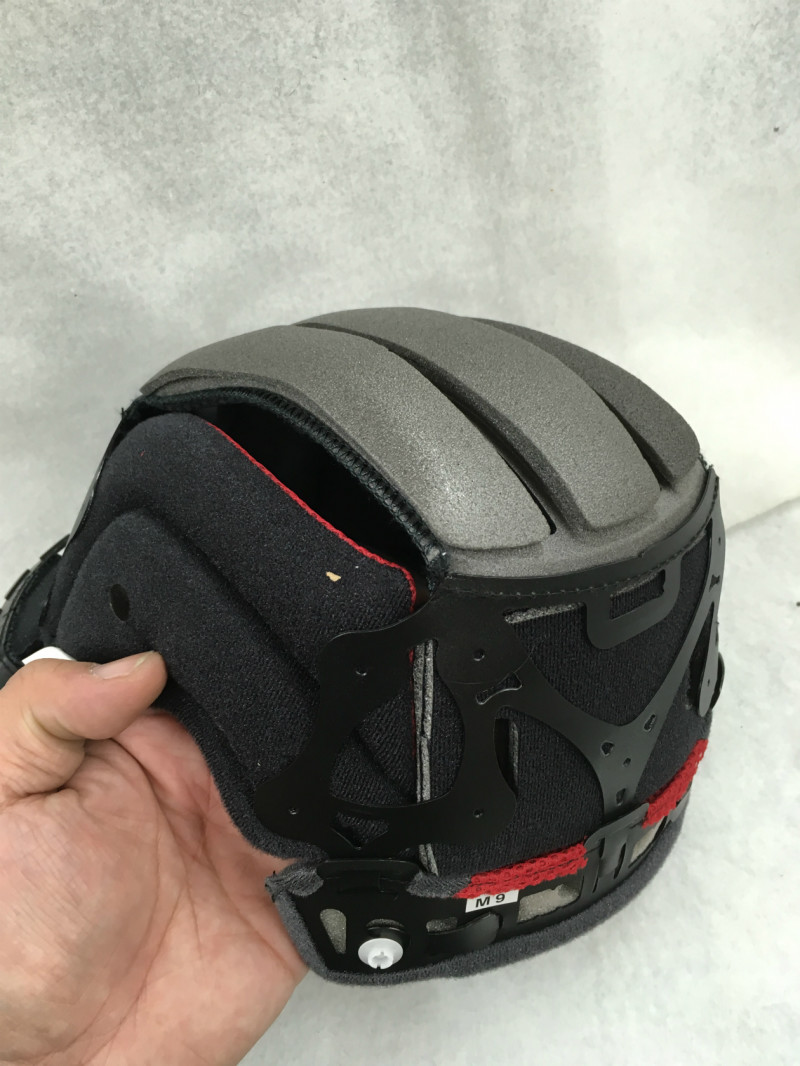
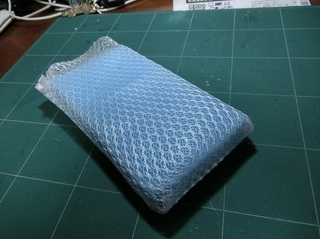
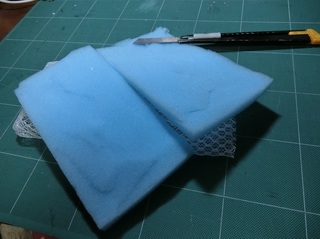
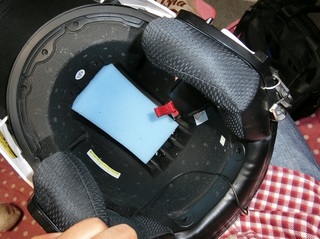
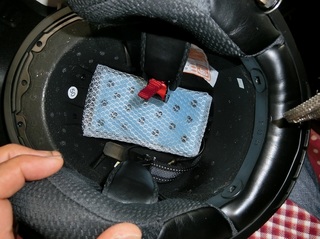
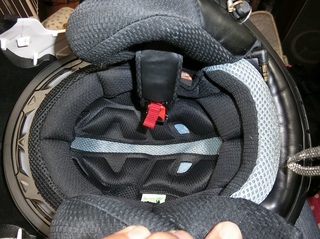
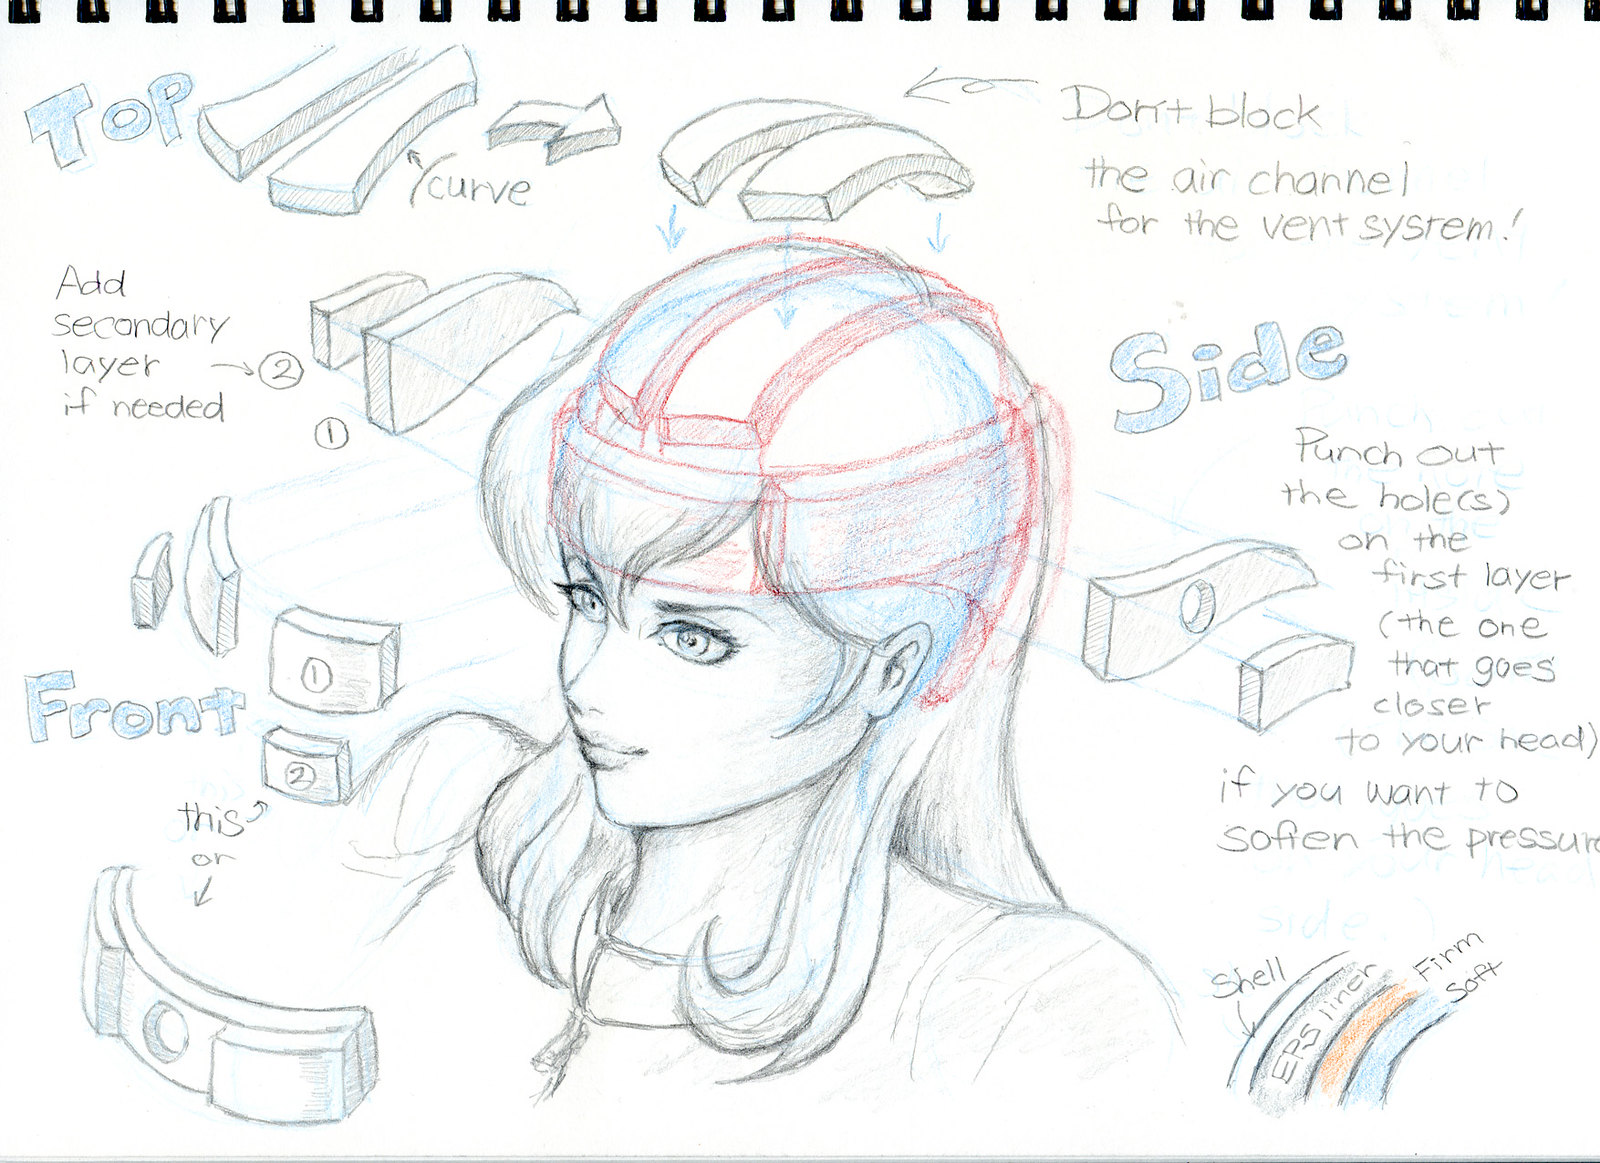
The solution is NOT to compress EPS liner with spoon, golf ball, or baseball bat, like some people do.
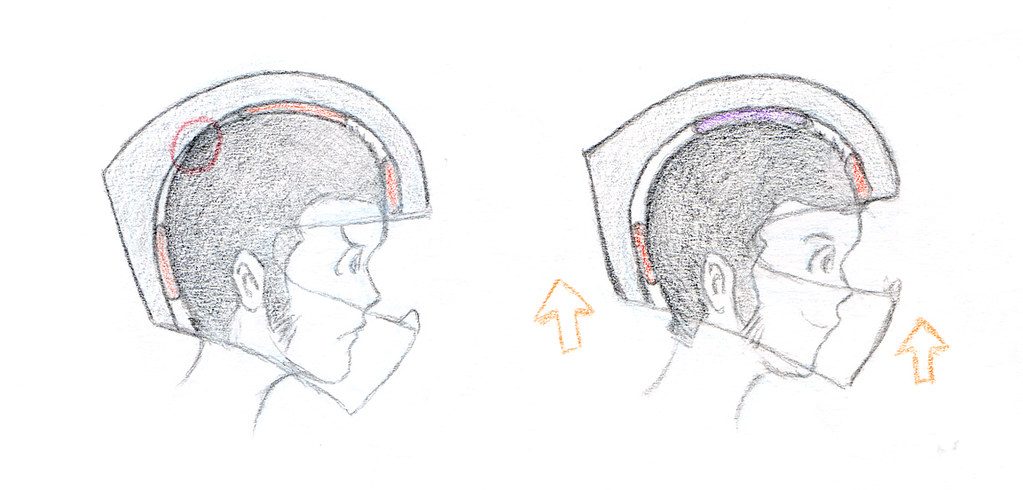
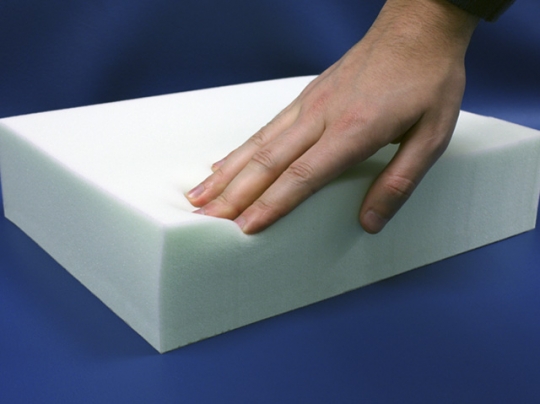
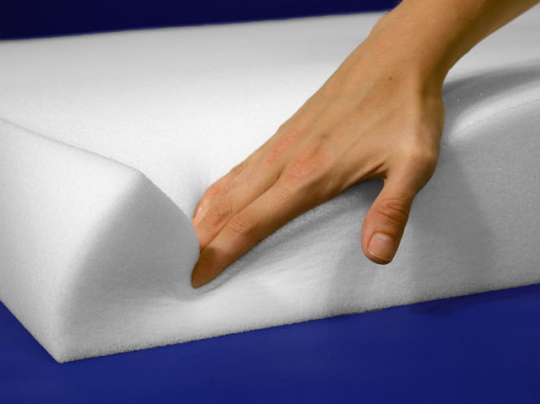
You need to change the thickness of the comfort liner padding.
fig. 5
... the end of part 1
to be continued
It (the style) may not fit well into BARF crowd, but the info is probably useful for those who have dreaded hot spot problem.
================================================
How to solve the helmet hot spot (pressure point) problem
Some people are lucky.
“Helmet? Just about any manufacturer’s size M would fit me fine.”
I’ve heard (read) comment like that.
If you are one of those people, consider yourself being lucky.
I’m writing this for those who are feeling like “It’s virtually impossible to find the helmet that won’t give me a painful hot spot. Pretty much every helmet I have tried starts hurting after an hour or so ...”
I started wearing motorcycle helmet in the early 80s, and yes, in the past, I had always had hot spot problem, until I found out what was causing it.
Seriously, ill fitting helmet can make you feel like you are wearing medieval torture device.
Isn’t it nice if you can wear helmet for long hours continuously, without feeling pain, yet it (the helmet) doesn’t slip around on your head every time you do the head check?
Know your head size and shape(not just “round, intermediate, long oval ...”)
[/size]
“If you know the enemy and know yourself, you need not fear the result of a hundred battles. If you know yourself but not the enemy, for every victory gained you will also suffer a defeat. If you know neither the enemy nor yourself, you will succumb in every battle.”
― Sun Tzu(544BC - 496BC) , The Art of War
So, following one of the greatest strategist and philosopher, we are going to figure out about ourselves (our own head) and, ...
the enemy... the helmet hot spot (what it really is, and how it happens).
The very first thing you need to do is to know your own head size and shape, before start looking at bunch of helmet reviews at Revzilla and Webbikeworld.
When you look at the user review of the helmet on the net, some people say Helmet XXX runs small and some say opposite, some say helmet ZZZ is narrow and some say it’s round. This happens because a lot (if not all) of them actually don’t know the “real” shape of their head.
Majority of the people just “think” they have intermediate oval / neutral shape head.
The word “intermediate” , “neutral” is a very slippery word.
Some are roundish, some are more oval-ish, some have bump, some have large flat area (usually forehead or the back of the head), all these small things can cause painful hot spot.
Now, rather than writing down the long and tedious generic theories about helmet fitting, I will use my own head as an example, to demonstrate how to get rid of the painful hot spot.
That way, you probably understand better “how to” solve the problem.
Taking measurement
So, take a tape measure, and measure your head circumference size, like a picture below.
But, everyone knows this already, right?
Note.
It is better to have someone to take a measurement, than trying to do by yourself.
Take a few measurement, and use the largest one.
Next, take a measurement of your head, front to back, side to side, using something like this
That's called sculpture’s caliper. You can find them at your local art supply store.
(In case you can't find it locally, here's one of the example where you can buy things like this.
https://www.sculpturehouse.com/p-21-sculptors-aluminum-caliper-12.aspx)
Alternatively, you can use the closet door (sliding door). Lay down on the floor, place your head between the door and the frame.
(If you do this, be careful when to do it. Try not to be witnessed by your wife/husband, girlfriend/boyfriend. They may start worrying about you.)
Next, run your finger tips on your head, to see if there’s any irregular bumps, large flat area, corners, etc.
This step is very important.
In my own case, this is the main reason of having the hot spot even though I’m wearing the correct size, correct shaped helmet.
Head shape
These days, most everyone who sells the helmets knows that they come in different internal shapes.
(If they don’t know, or seems like they are not willing to spend some time with you, don’t buy from them.)
I assume, if you are reading this, you already did the homework and know about the basics,(long oval, intermediate oval, round, etc, etc), so I believe you are not trying to squeeze your long oval shaped head into the round helmet (or, the other way around.)
Thus, I’m not going to talk about those basic mistakes.
And, if you have the helmet with wrong internal shape, nothing really helps. You have to start with the helmet that has , at least, the internal shape that is close to your head.
One thing I would like to talk about the head / helmet internal shape, is that the vagueness of the term, such as “long oval”, “intermediate”, etc.
Take a look at the picture below.
fig.1
What people call “long oval head” is either “long elliptical” or “long sub-elliptical” head.
What referred as “intermediate” “neutral” is anywhere in between “elliptical” and “short-sub-elliptical”.
What called “round” is,... well, “spherical”.
Now, take a look at the measurement we took.
My own head measurements are
Circumference 56.5 cm
Width (Side to side) 17 cm
Length(Frond to back) 19 cm
Width (side-side) : length (front-back) ratio is 0.89 : 1. (I will talk about this later.)
Side to side measurement is about 10% shorter than front to back measurement.
Judging from these numbers,my head shape seems like so called “round-oval”.
The catch is, it is NOT.
What these numbers don't tell you is that my head is pretty narrow at front(S size), the back side is a lot wider(M size or between M and L).
On top of that, my head has pointy corners at the top/back.
And that’s why lid-picker or helmet fitment data base on the internet (such as webbikeworld) never helped me.
Take a look at the picture below.
fig.2
fig.3
SO, my head at crown area (section X-X) is a “short, short sub-elliptical” head.
Widest part of the head is closer to the back of the head, rather than in the middle (around the ears, temple area), front half is smaller than the rear half, narrow at forehead area, wider at the back.
However, at section Y-Y, near the top of my head, it ends with square-ish corners at each side.
Looking at from the back (section Z-Z), it looks like I have square shaped head at the top.
(Note: Keep in mind, the shape in the drawing is exaggerated so that you can see it clearly.)
So, these pointy corners at the back of my head start hurting after an hour or so, because some of the weight of the helmet is on these two “points”, rather than evenly spread over the large surface area.
And, if I go up one size larger helmet, wrongly thinking that the pain comes from “too tight” fitting helmet, things get worse.
Because with the loose fitting, the crown area can no longer support the weight of the helmet, and all of the weight will be on three points, on top of the head and two corners at the end.
fig.4
As you can see, too small helmet would be pinching the side of my head, and it becomes a torture device after an hour or so.
(And if I get stuck in the heavy traffic, it really is a torture.)
Unfortunately, there aren’t many helmets with egg shaped (narrow at front, wide at the back) internal.
Even if I wear right size, typical “round-oval” helmet still gives me hot spot after 45min to 1 hour.
The solution is NOT to compress EPS liner with spoon, golf ball, or baseball bat, like some people do.
You need to change the thickness of the comfort liner padding.
fig. 5
... the end of part 1
to be continued


 arty
arty