MackeyStingray
New member
I'll seperate the cam swap howto and actual valve check & adjust howto.
Valve check on an SV should be done every 15k mi.
Experience Level: Advanced
Engine should be dead cold when doing an adjustment.
1. remove both seats
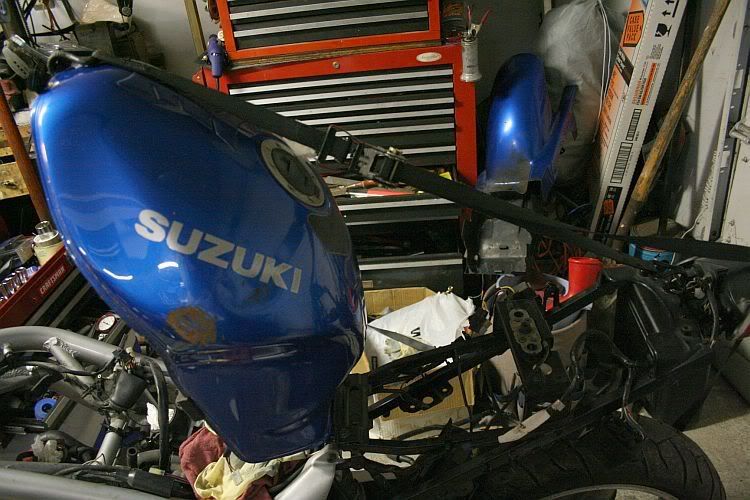
2. lift gas tank.
2A use a tank prop from the trunk
2B use a tie down to hook onto the tank and the rear grab rail or something solid in the trunk. you may want to use a rag to keep the tank from getting scratched. obviously i don't care
3. drain coolant and remove radiator
4. remove sparkplugs (good time to replace plugs)
5. remove valve covers
6. remove stator/generator plug (1; 10mm hex) & timing inspection plug (2; 8mm hex)
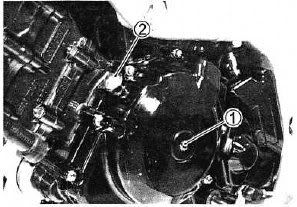
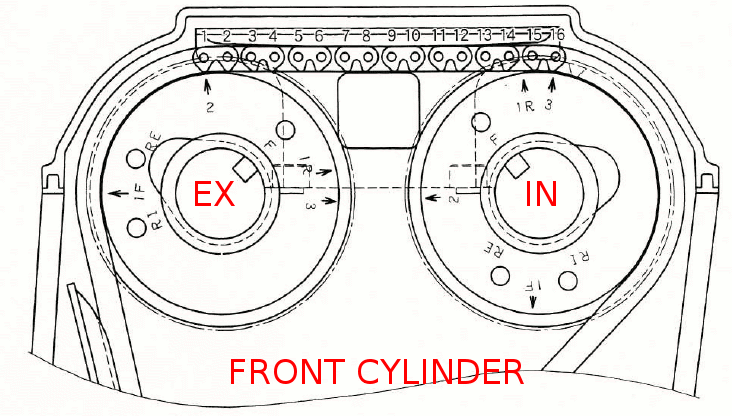
7. use a 17mm socket/ratchet and turn the engine by hand counterclockwise and find the | F mark to measure the front cylinder. this is where the cams are at Top Dead Center (TDC)
cam lobes should look like A position
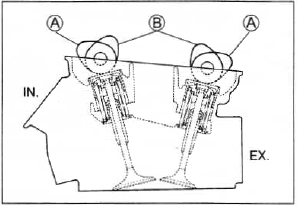
8. clearance check time. use a feeler guage and insert it between the cam lobe and the tappet or "bucket"
Clearance spec:
IN: 0.10-0.20 mm (0.004 - 0.008in)
EX: 0.20-0.30 mm (0.008 - 0.012 in)
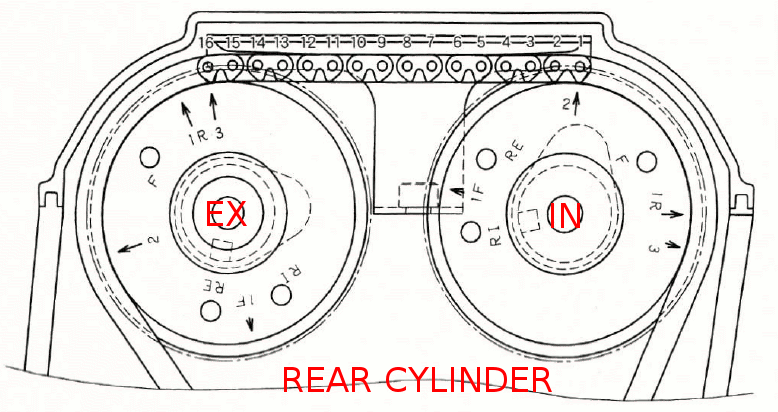
9. turn the engine 270° to the |R mark and measure the rear cylinder the same way once it's @ TDC
cam lobe should be in the B position

9A. Write down all your measurements on a piece of paper.
ideal specs:
IN 0.15mm
EX 0.27mm
-----
If either need adjustment:
10. remove the top cam chain guide and mark the chain and cam sprockets so it'll be easier to reassemble later.
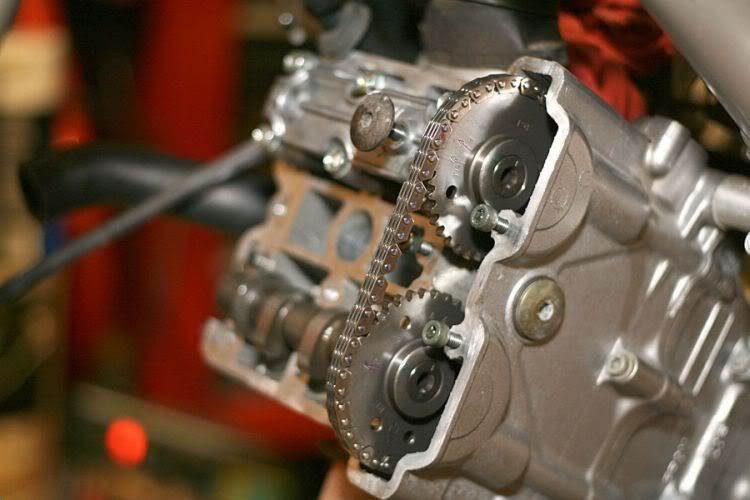
11. make sure the cams are @ TDC position.
11A. if keeping stock CCT, remove 10mm nut and use a flathead screwdriver to keep the tension off the chain. find a way to lock the CCT in the "loose" position
11B. use this as an opportunity to install APE CCT and remove the stock CCT completely.
12. remove cam housing w/ 10mm wrench. make sure dowel pins do not drop into engine
13. remove cams. make sure not to drop the cam chain into the engine.
14. mark which tappet goes to which valve and remove them. do not mix and match them. you may need to use a magnet or some duct tape.
15. now comes the actual "adjustment"
15A. use this formula to figure out which shim you need:
A = (B-C) + D
A = New shim you need
B = Recorded Clearance
C = Spec you want
D = Old shim size (should be stamped on shim; if not, use a micrometer to find out)
15B. in most cases, you can play "musical chairs" and swap shims around to get the desired spec.
16. squirt a little bit of oil in the tappet before reinstallation
17. reinstall the cams and check timing marks so they line up.
18. install cam housing. torque spec (TC): 10Nm (7ft-lb)
19. reinstall the CCT or add tension (slowly).
20. recheck timing marks.
20A. if still using stock CCT, torque adjuster bolt 8Nm (6ft-lb). frankly, just snug is fine. don't forget to recheck later for any leaks and tighten 1/16 turn till it stops.
21. reinstall cam chain guide TS: 10Nm (7ft-lb)
22. reinstall valve cover TC: 14Nm (10ft-lb)
Valve Timing Inspection plug (8mm hex) 23Nm (16.5ft-lb)
Generator cover plug (10mm hex) 11Nm (8ft-lb)
23. install (new) sparkplugs. use anti-seize compound on threads
24. reinstall radiator and hoses. refill, start and bleed.
Valve check on an SV should be done every 15k mi.
Experience Level: Advanced
Engine should be dead cold when doing an adjustment.
1. remove both seats
2. lift gas tank.
2A use a tank prop from the trunk
2B use a tie down to hook onto the tank and the rear grab rail or something solid in the trunk. you may want to use a rag to keep the tank from getting scratched. obviously i don't care

3. drain coolant and remove radiator
4. remove sparkplugs (good time to replace plugs)
5. remove valve covers
6. remove stator/generator plug (1; 10mm hex) & timing inspection plug (2; 8mm hex)

7. use a 17mm socket/ratchet and turn the engine by hand counterclockwise and find the | F mark to measure the front cylinder. this is where the cams are at Top Dead Center (TDC)
cam lobes should look like A position

8. clearance check time. use a feeler guage and insert it between the cam lobe and the tappet or "bucket"
Clearance spec:
IN: 0.10-0.20 mm (0.004 - 0.008in)
EX: 0.20-0.30 mm (0.008 - 0.012 in)
9. turn the engine 270° to the |R mark and measure the rear cylinder the same way once it's @ TDC
cam lobe should be in the B position

9A. Write down all your measurements on a piece of paper.
ideal specs:
IN 0.15mm
EX 0.27mm
-----
If either need adjustment:
10. remove the top cam chain guide and mark the chain and cam sprockets so it'll be easier to reassemble later.

11. make sure the cams are @ TDC position.
11A. if keeping stock CCT, remove 10mm nut and use a flathead screwdriver to keep the tension off the chain. find a way to lock the CCT in the "loose" position
11B. use this as an opportunity to install APE CCT and remove the stock CCT completely.
12. remove cam housing w/ 10mm wrench. make sure dowel pins do not drop into engine
13. remove cams. make sure not to drop the cam chain into the engine.
14. mark which tappet goes to which valve and remove them. do not mix and match them. you may need to use a magnet or some duct tape.
15. now comes the actual "adjustment"
15A. use this formula to figure out which shim you need:
A = (B-C) + D
A = New shim you need
B = Recorded Clearance
C = Spec you want
D = Old shim size (should be stamped on shim; if not, use a micrometer to find out)
15B. in most cases, you can play "musical chairs" and swap shims around to get the desired spec.
16. squirt a little bit of oil in the tappet before reinstallation
17. reinstall the cams and check timing marks so they line up.


18. install cam housing. torque spec (TC): 10Nm (7ft-lb)
19. reinstall the CCT or add tension (slowly).
20. recheck timing marks.
20A. if still using stock CCT, torque adjuster bolt 8Nm (6ft-lb). frankly, just snug is fine. don't forget to recheck later for any leaks and tighten 1/16 turn till it stops.
21. reinstall cam chain guide TS: 10Nm (7ft-lb)
22. reinstall valve cover TC: 14Nm (10ft-lb)
Valve Timing Inspection plug (8mm hex) 23Nm (16.5ft-lb)
Generator cover plug (10mm hex) 11Nm (8ft-lb)
23. install (new) sparkplugs. use anti-seize compound on threads
24. reinstall radiator and hoses. refill, start and bleed.
Last edited:
