Mine arrived today, and I decided....WTF....I'm taking off the patches. So here is what you're going to need if you decided to remove them.
1. patience
2. time
3. razor blade (new)
4. tweezers (good ones, preferably with a angel)
5. seam ripper, I only used mine a couple of times to get around some difficult corners
6. goo gone, yes, it works!!!
7. clean cloth, for apply the goo gone
8. paper towel
Here's how I did it:
1. Remove the armor and the liner in the jacket
2. Remove one patch at a time, being very careful not to slice the leather (I inflicted a couple of micro slices, but overall no damage to the jacket

)
3. Apply the goo gone. You can scrap the big chunks of glue off with your finger after you soak them with goo gone. It's sticky business, so have your paper towel handy. As an added bonus; there are some pencil outlines on the jacket, underneath the patches, that were probably used as reference points for applying the patch, the goo gone gets rid of those as well. yes.......
4. Use the tweezers to remove the stitching. Every once in a while, you'll grab a thread that will give a bit of resistance. You'll want to pull this thread out, as it is the mother thread and will remove a bunch of stitches with it.

5. after removing the stitches (you might have some small ones left, get them later) apply another round of goo gone. the stitching will sometimes hold some glue
6. repeat until all the patches you want off are off. Here's a tip: the leather patches are the hardest to remove (the Jordon suede one along the sleeve is the hardest) If you don't mind the leather Joe Rocket symbol on the back, keep it on cause that thing is double stitched and leaves a bunch of holes behind. The plastic patches are cake, yes, that's right cake bitches, NOT pie.
7. After you get all the patches off that you want, go back and check for threads and clean those up. This is where the angles tweezers come in handy.
8. You just put a nasty chemical all over your new jacket. Get some warm water and a clean cloth and clean that thing. Let it air dry.
9. Treat with a leather cleaner and conditioner, if you want. I didn't.
10. Put the armor and liner back in the jacket. You're done!

The first pic is the sweet box of goodness. Along with my jacket, I got my wife a jacket (which fit her nicely and she really liked), and a pair of JR gloves. I'm glad I only paid $15 for those, cause that's about all they're worth.
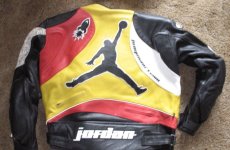
2nd pic is the jacket front before (sorry about the pic don't know what happened), 3rd pic is the jacket back before, 4th pick is the back with some glue and stitching on it. I'll put the finished pics in the next thread.

 cheers to you!
 I'll be sporting the blue... will definitely dye / paint it darker. Or pink