It may just be the pics. I used the West Systems epoxy on all my stuff. You'll be fine with that. Just remember, if you don't paint it with a UV protectant clear coat and the part sees a fair amount of sun, it'll yellow epoxy, too.DougZ said:One more question about the mold making: It looks from the pics, that the molds you made have the same yellow tint that my molds do, with the cheapy resin.
Are you using one resin for mold making and one, the better epoxy one, for making the final parts?
I ask cause I did a practice piece as soon as I got the Silver CF, and the yellow tint certainly takes away from the appearance of it. I want/need/must have the clearest drying resin possible.
-
There has been a recent cluster of spammers accessing BARFer accounts and posting spam. To safeguard your account, please consider changing your password. It would be even better to take the additional step of enabling 2 Factor Authentication (2FA) on your BARF account. Read more here.
SV Carbon Tank project for Zoran
- Thread starter tygaboy
- Start date
DougZ
New member
- Joined
- Dec 21, 2006
- Location
- New Jersey
- Moto(s)
- 2003 SV 1000, 2001 GSXR 600, 2003 HD Sporty 1200, KDX 200
tygaboy said:It may just be the pics. I used the West Systems epoxy on all my stuff. You'll be fine with that. Just remember, if you don't paint it with a UV protectant clear coat and the part sees a fair amount of sun, it'll yellow epoxy, too.
I wonder how long it will take for that to happen. I hate the though of doing all this work and then having to take it somewhere for more work and cost...hummm.
Silversix
New member
That was the best four hours of dial-up reading I have ever had!
Thanks for sharing.
You Sir are awesome!
Maybe I could attempt my own farings............................... maybe!
Thanks for sharing.
You Sir are awesome!
Maybe I could attempt my own farings............................... maybe!
wow! amazing information! i am now inspired to finally build something to cover my bare butt!
can you suggest a way to create a plug for my tail section? i have an idea in my head, but don't know what materials to use as a starting point.
thanks!
can you suggest a way to create a plug for my tail section? i have an idea in my head, but don't know what materials to use as a starting point.
thanks!
4tuneit1
Circle Jerk in the Sink.
Bravo!! What an informative thread. I've done alot of carbon work, fairings etc..but never a tank...partly because of the complexity. You nailed it!
slydrite
On a brake
Silversix said:That was the best four hours of dial-up reading I have ever had!

oh wait,......you didn't mean for that to be funny....my bad
RAin geAR said:wow! amazing information! i am now inspired to finally build something to cover my bare butt!
can you suggest a way to create a plug for my tail section? i have an idea in my head, but don't know what materials to use as a starting point.
thanks!
Just follow the same process as I used to make the plug for this tank: take a splash mold from your current tail, make a part, change the shape, etc. until you get the shape you want. Then make your production mold and then the part(s).
What could be easier?

tygaboy said:Just follow the same process as I used to make the plug for this tank: take a splash mold from your current tail, make a part, change the shape, etc. until you get the shape you want. Then make your production mold and then the part(s).
What could be easier?
Letting you do it for us

ha ha ha... wouldn't be as fun for me if you did it...
anyhow, my bike didn't come with a tail piece (i got it as a crashed race bike). i have a design in mind to go on the home made subframe, but don't know how where to start.
anyhow, my bike didn't come with a tail piece (i got it as a crashed race bike). i have a design in mind to go on the home made subframe, but don't know how where to start.
RAin geAR said:ha ha ha... wouldn't be as fun for me if you did it...
anyhow, my bike didn't come with a tail piece (i got it as a crashed race bike). i have a design in mind to go on the home made subframe, but don't know how where to start.
I'd buy an e-bay replacement or race fiberglass and either call it done or use the part as the starting point. As I've always said, if you can buy the part rather than build it, you'll save time and money. On the other hand, if you just "want" to give it a go or make a custom part, by all means do!
Again, using a stock or aftermarket part as as starting point generally gets you started more quickly, locates the key mounting points, etc. But you can always start with an appropriately sized cardboard box, pour in the 2 part expandgn foam and start sanding to shape!
I used a variety of standard parts and custom pieces to make the plug for my SV/MV tank. The final production part turned out great, IMO:

Justin
New member
- Joined
- Apr 19, 2006
- Location
- Hayward,CA
- Moto(s)
- '05 RC51, '08 KTM 530EXCR Supermoto, '02 CR250, '01 XR50
Tygaboy - I have a question about heat resistance with the composite materials. I have made my own parts before, but not moto-related. I have made some CF bracketry in the engine compartment in my twin turbo mustang. I have seen CF exhaust cans on bikes before, and I would like to make some CF exhaust guards for my one-off custom exhaust on my RC51. Do you have any knowledge/experience on what this stuff can handle temperature-wise??
Justin said:Tygaboy - I have a question about heat resistance with the composite materials. I have made my own parts before, but not moto-related. I have made some CF bracketry in the engine compartment in my twin turbo mustang. I have seen CF exhaust cans on bikes before, and I would like to make some CF exhaust guards for my one-off custom exhaust on my RC51. Do you have any knowledge/experience on what this stuff can handle temperature-wise??
Justin,
It works as muffler material on bikes just fine - though it can develop hot spots that will eventually burn through - mostly in race applications where you're moving lots of hot exhaust. My track day Ducati had carbon mufflers and a carbon heat shield between the mufflers and tail. It all worked just fine. But about all I'd say is "give it a go".
Not sure what you have planned but if it's a muffler, the only tricky part is making the tube. I've made a couple tubes so it's doable.
I'm about to install a turbo diesel engine in my '52 Suburban hot rod project and I'm planning a bunch of carbon trim and accent pieces so I may end up with some more useful "heat exposure" experience in the near future.
Chris
925-708-5295
Last edited:
Justin
New member
- Joined
- Apr 19, 2006
- Location
- Hayward,CA
- Moto(s)
- '05 RC51, '08 KTM 530EXCR Supermoto, '02 CR250, '01 XR50
I am gonna give it a go, try to make some CF exhaust pieces, they will be going on my Bike though. I made all my own headers and downpipes on my twin Turbo car though.
So what have you found as the best method for making a CF tube??
Thanks for sharing all your knowledge. I am new to the bike world, but I have built a couple cars, and experimented at great length with my twin turbo mustang, everything on the car was hand made, no kits or anything....
So what have you found as the best method for making a CF tube??
Thanks for sharing all your knowledge. I am new to the bike world, but I have built a couple cars, and experimented at great length with my twin turbo mustang, everything on the car was hand made, no kits or anything....

Justin said:I am gonna give it a go...So what have you found as the best method for making a CF tube??
Thanks for sharing all your knowledge. I am new to the bike world, but I have built a couple cars, and experimented at great length with my twin turbo mustang, everything on the car was hand made, no kits or anything....
Awesome that you did your own twin turbo! I love that stuff...
On the tube, you need to determine the shape and length you want and make a plug - or use an existing muffler, etc.
Make a splitter plate (see that part of this thread) for each side of the muffler shape. Bolt them together and lay up the carbon inside with the seam at "the bottom" of the shape. With a bit of contorting, you should be able to get your arm inside the tube to get the layup done. Insert the peel ply and breather then slide in a modified inner tube and pump it up - you now have a "pressure" approach, rather than a vacuum approach.
Let it cure, deflate the tube, unbolt the mold halves and take out your tube!

Justin
New member
- Joined
- Apr 19, 2006
- Location
- Hayward,CA
- Moto(s)
- '05 RC51, '08 KTM 530EXCR Supermoto, '02 CR250, '01 XR50
Nice....That is exactly the idea I had going through my head when attacking the how-to on this tube deal.... Great minds think alike! ! !
overthepond
New member
Just wanted to register to pop in and say this has been the most helpful thing I have read, ever, in 15 years of internet'ing'. You (someone) should make this into a site/howto article!
I intend to try some simple parts ASAP.
I intend to try some simple parts ASAP.
How about "Lost Foam" method?
Hey there - Anyone every try making a fuel tank with a male mold from polystyrene foam, doing the layup over this and then pouring acetone through the cap hole to melt the foam away? I've read about this technique being used for complex shapes; it was actually recommended to me by a support fellow at Tap Plastics.
I'm just doing a one-off job, so all the production that goes into making a complex female mold design seems excessive.
I tried this with just a small prototype and it seems to work, but there's still a bit of residual "goo" from the foam/acetone reaction. Not sure how well it's going to clean out, and further what could happen once the tank gets filled with gasoline...
Thanks!
Okay, Here's a simple proof of concept for the "Lost Foam" method:
I started with a rough shape built from layers of styrofoam bonded together from the epoxy resin that I've been using, mixed with a little glass microspheres so that it's more readily sandable next to the foam (reduces the resin's density so that it's closer to the soft foam):
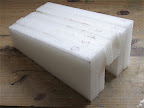
Here's the rough shape, covered in packing tape and with a little handle bonded into where the fuel cap would go.

Cutting Glass from paper templates derived from fitting to the piece.

A lot of awkward steps later, the resin and fiberglass have been applied, then a layer of peelply, and breather cloth. Assembly shoved into a vacuum bag and sucked tight:

After resin cured, it's time cut away the peel ply and breather cloth. The exercise is much like shucking a very tenacious corn cob


Pour a little acetone into the cap area and let chemistry do its thing. once all that melts you can pull the tape out of the system. Placenta?

And here's the proof. Not terribly bad. Would take more than a little fairing to make nice and if this test were real, I'd probably use at least 4 more layers of glass;

I started with a rough shape built from layers of styrofoam bonded together from the epoxy resin that I've been using, mixed with a little glass microspheres so that it's more readily sandable next to the foam (reduces the resin's density so that it's closer to the soft foam):
Here's the rough shape, covered in packing tape and with a little handle bonded into where the fuel cap would go.
Cutting Glass from paper templates derived from fitting to the piece.
A lot of awkward steps later, the resin and fiberglass have been applied, then a layer of peelply, and breather cloth. Assembly shoved into a vacuum bag and sucked tight:
After resin cured, it's time cut away the peel ply and breather cloth. The exercise is much like shucking a very tenacious corn cob
Pour a little acetone into the cap area and let chemistry do its thing. once all that melts you can pull the tape out of the system. Placenta?
And here's the proof. Not terribly bad. Would take more than a little fairing to make nice and if this test were real, I'd probably use at least 4 more layers of glass;
overthepond
New member
Problem with male moulds is the bloody awful surface finish that is left - takes so long to sand flat and still looks crap Done a few kiteboards like that and never happy with them.
Done a few kiteboards like that and never happy with them.