MackeyStingray
New member
Difficulty Level: Advanced (for the DIYer)
Parts:
Intake Cams:
12710-17G00
12730-17G00


Cam Chain Tensioner (CCT) Gaskets (x2)
P/N: 12837-24A10
APE Manual CCT (optional)
I didn't take pics of every single step but you should be competent enough to not need to see every step if you are to do this modification. If at any point you aren't sure what or how to do 1 of these steps, DO NOT PROCEED ANY FURTHER and take it to a professional.
Steps:
1. remove bodywork (SVS model). side fairings only.
2. remove radiator (highly recommended but not necessary)
3. remove or lift gas tank (i remove as it's easier to work on rear cylinder)
4. remove sparkplugs (front and rear)
5. remove cylinder head covers (front and rear)
6. remove generator plug cover (10mm hex)

7. remove timing inspection plug (8mm hex)
8. turn the crankshaft via the generator rotor (17mm socket) and align it w/ the *|F* mark

FRONT CYLINDER:
9. mark the cam chain with a sharpie or magic marker at the timing marks


10. remove the cam chain guide
11. remove CCT. loosen adjuster nut before removing if reusing stock CCT.
12. remove intake and exhaust camshaft housing
13. remove intake and exhaust camshafts. make sure the cam chain does not fall into cylinder head. use zip ties or safety wire and hang it from the frame.
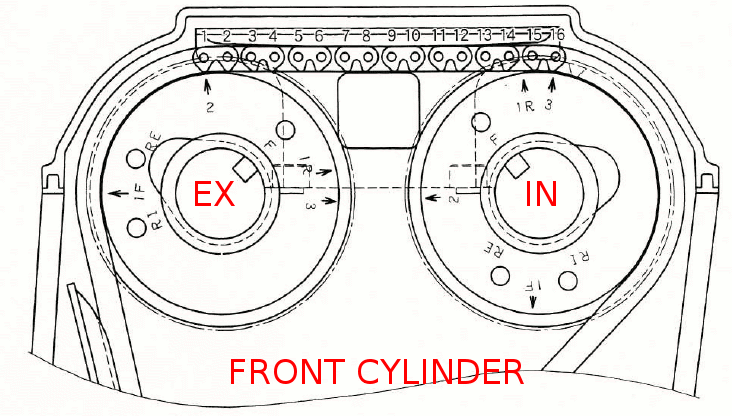
14. mark the old intake cam (OI) like so with a sharpie:
Note: if you bought the cams as a set and not sure which cam goes to which head, check the lobes and match up the OI to the new intake (NI) so the timing marks and lobes are identical.

Note: We want to transfer these marks onto the OI. As a reference we'll use the '3' mark, it is 65.5 deg CCW from the lobe, therefore the new 'lF' mark will be 65.5 - 29.5 = 36 deg CW from the '3' To get the 36 deg, start at the '3' mark which points to a valley, go 3 valley (30 deg) and then to the next peak (5 deg) for a total of 35 deg (as close as you can get it) For the '2' mark, it'll be 53.5 deg CW from the lobe, again starting from the existing '3' mark, go CW 36 + 29.5 + 53.5 = 119 deg Count 12 valleys from' 3 r mark
15. Install OI into the exhaust side using the new timing marks. 1F should be flush with the cylinder head pointing to the exhaust. line up the cam chain to the new 2 mark
16. Install the NI cam into the intake side using the same timing mark 3. It's 16 links from new #2 timing mark from the OI.
17. Re-Install camshaft housing (7ft-lb torque)
18. Check valve clearance and adjust as necessary. OEM manual procedures P1 | P2 | P3 | P4 | P5
Formula: A = (B-C) + D
A=Shim you want
B=Recorded Clearance
C=Clearance you want
D=Shim you have
Intake spec (0.1-0.2mm). set preferably to 0.15
Exhaust spec (0.2-0.3mm). set preferably to 0.27
19. Re-Install CCT (7ft-lb torque mount bolts; 6ft-lb for adjuster nut)
REAR CYLINDER:
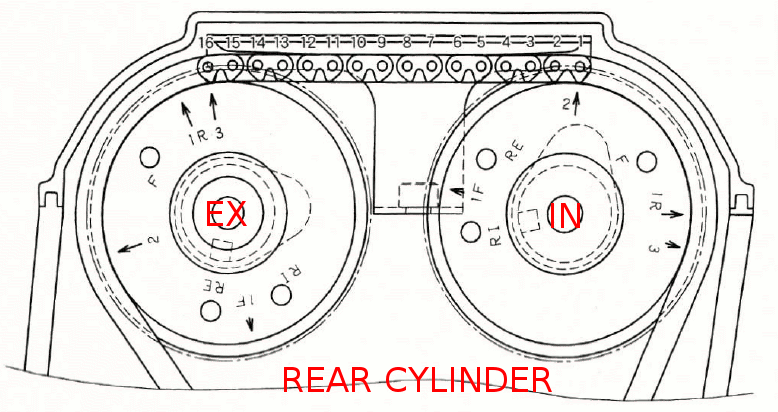
20. timing marks will be flip-flopped around (1F & 2 will be on the intake side and visa versa)
same steps, except timing marks are slightly different and a bit of a pain to get to the rear CCT. you may need to remove the right rearset (rear brake side) to gain access

Use this timing mark for the OI

21. Rotate the engine and recheck your timing marks. if it binds anywhere, adjust otherwise you'll do bad things that cost $$$$.
22. Button everything back up and ride.
Torque settings:
Head Cover bolt 10ft-lb
Valve Timing Inspection plug (8mm hex) 16.5ft-lb
Generator cover plug (10mm hex) 8ft-lb
If you installed APE CCT's, read the instructions and adjust as necessary
-----
Some people have reported needing to rejet their bikes afterwards. YMMV but it's a good idea to do a before and after dyno run for this swap. Reported gains were in the 7-9rwhp range. Very nice hp bump for a couple hundred dollars and a day of work. This is essentially the same as a JHS stage II cam kit.
Thanks to zoran (TWF) for the cams and for sharing the knowledge. If it weren't for him, the common rider would not even know what this was or how to do it. Alot of tuners like to keep secrets from the competition and zoran's always been helpful
Thanks to valgar for hosting the pics
little dyno tune comparo from quasi's (now drizz's) bike:
http://www.bayarearidersforum.com/forums/showthread.php?s=&threadid=136075
NOTE FOR 2003+ OWNERS:
Installing the 1st gen intake cams (1GIC) into your exhaust side will net some hp gains. basically skip the intake side and do the exhaust side using the 1GIC and marking them the same as you would in this tutorial. You wil not get the same increase in hp but if you have a couple hundred bucks burning a hole in your pocket and time on your hands, it's possible to do.
Parts:
Intake Cams:
12710-17G00
12730-17G00


Cam Chain Tensioner (CCT) Gaskets (x2)
P/N: 12837-24A10
APE Manual CCT (optional)
I didn't take pics of every single step but you should be competent enough to not need to see every step if you are to do this modification. If at any point you aren't sure what or how to do 1 of these steps, DO NOT PROCEED ANY FURTHER and take it to a professional.
Steps:
1. remove bodywork (SVS model). side fairings only.
2. remove radiator (highly recommended but not necessary)
3. remove or lift gas tank (i remove as it's easier to work on rear cylinder)
4. remove sparkplugs (front and rear)
5. remove cylinder head covers (front and rear)
6. remove generator plug cover (10mm hex)

7. remove timing inspection plug (8mm hex)
8. turn the crankshaft via the generator rotor (17mm socket) and align it w/ the *|F* mark

FRONT CYLINDER:
9. mark the cam chain with a sharpie or magic marker at the timing marks


10. remove the cam chain guide
11. remove CCT. loosen adjuster nut before removing if reusing stock CCT.
12. remove intake and exhaust camshaft housing
13. remove intake and exhaust camshafts. make sure the cam chain does not fall into cylinder head. use zip ties or safety wire and hang it from the frame.
14. mark the old intake cam (OI) like so with a sharpie:
Note: if you bought the cams as a set and not sure which cam goes to which head, check the lobes and match up the OI to the new intake (NI) so the timing marks and lobes are identical.

Note: We want to transfer these marks onto the OI. As a reference we'll use the '3' mark, it is 65.5 deg CCW from the lobe, therefore the new 'lF' mark will be 65.5 - 29.5 = 36 deg CW from the '3' To get the 36 deg, start at the '3' mark which points to a valley, go 3 valley (30 deg) and then to the next peak (5 deg) for a total of 35 deg (as close as you can get it) For the '2' mark, it'll be 53.5 deg CW from the lobe, again starting from the existing '3' mark, go CW 36 + 29.5 + 53.5 = 119 deg Count 12 valleys from' 3 r mark
15. Install OI into the exhaust side using the new timing marks. 1F should be flush with the cylinder head pointing to the exhaust. line up the cam chain to the new 2 mark
16. Install the NI cam into the intake side using the same timing mark 3. It's 16 links from new #2 timing mark from the OI.
17. Re-Install camshaft housing (7ft-lb torque)
18. Check valve clearance and adjust as necessary. OEM manual procedures P1 | P2 | P3 | P4 | P5
Formula: A = (B-C) + D
A=Shim you want
B=Recorded Clearance
C=Clearance you want
D=Shim you have
Intake spec (0.1-0.2mm). set preferably to 0.15
Exhaust spec (0.2-0.3mm). set preferably to 0.27
19. Re-Install CCT (7ft-lb torque mount bolts; 6ft-lb for adjuster nut)
REAR CYLINDER:
20. timing marks will be flip-flopped around (1F & 2 will be on the intake side and visa versa)
same steps, except timing marks are slightly different and a bit of a pain to get to the rear CCT. you may need to remove the right rearset (rear brake side) to gain access

Use this timing mark for the OI

21. Rotate the engine and recheck your timing marks. if it binds anywhere, adjust otherwise you'll do bad things that cost $$$$.
22. Button everything back up and ride.
Torque settings:
Head Cover bolt 10ft-lb
Valve Timing Inspection plug (8mm hex) 16.5ft-lb
Generator cover plug (10mm hex) 8ft-lb
If you installed APE CCT's, read the instructions and adjust as necessary
-----
Some people have reported needing to rejet their bikes afterwards. YMMV but it's a good idea to do a before and after dyno run for this swap. Reported gains were in the 7-9rwhp range. Very nice hp bump for a couple hundred dollars and a day of work. This is essentially the same as a JHS stage II cam kit.
Thanks to zoran (TWF) for the cams and for sharing the knowledge. If it weren't for him, the common rider would not even know what this was or how to do it. Alot of tuners like to keep secrets from the competition and zoran's always been helpful
Thanks to valgar for hosting the pics
little dyno tune comparo from quasi's (now drizz's) bike:
http://www.bayarearidersforum.com/forums/showthread.php?s=&threadid=136075
NOTE FOR 2003+ OWNERS:
Installing the 1st gen intake cams (1GIC) into your exhaust side will net some hp gains. basically skip the intake side and do the exhaust side using the 1GIC and marking them the same as you would in this tutorial. You wil not get the same increase in hp but if you have a couple hundred bucks burning a hole in your pocket and time on your hands, it's possible to do.
Last edited:

 )
)
