• There has been a recent cluster of spammers accessing BARFer accounts and posting spam. To safeguard your account, please consider changing your password. It would be even better to take the additional step of enabling 2 Factor Authentication (2FA) on your BARF account. Read more here.

1983 CX650 Eurosport restoration thread.

Once again, more evidence that this bike is a prototype.
Larry started working on the rims, cleaning, polishing, then a unique surprise.
The hubs were painted. Honda's M.O. with the CX series was to leave the hubs as raw aluminum, but clear coated.
He found paint.
These wheels cannot be pulled apart and put back together after they leave the factory, unless it is done at the factory. Honda used a special triangular bolt at the hub, and a specific rivet at the rim. It is possible to replicate in the modern era, but prohibitively expensive for a 2 year, less than 12,000 produced bikes.
Honda did not rebuild Eurosport or Turbo boomerang wheels, it was cheaper to replace them.
So, these hubs were painted at the factory.

Side note: Larry also restored the last known surviving Canadian frame CX650E.
It's wheel hubs were clear coated aluminum.

Oh, yeah, he hand cut the wheel damping shims.20240816_174143.jpg20240816_180325.jpg20240816_174224.jpg
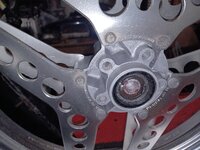
 
The paint on the rear hub is proving to be tougher to remove than the front. (of course).
20240820_141445.jpg


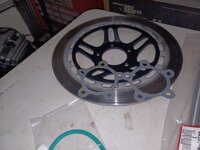
Parts are back from the powder coater, BLING!!
20240820_162312.jpg


Wait, what happened here?
Swing arm is going back to get stripped and re-coated.
20240820_144902.jpg

20240820_145008.jpg
 
Coming along Tim...!

Bummer on the swingarm, but I am sure it will join the bling!
 
Paint stripper wasn't working on the rear hub paint.
Larry taped off and vapor blasted the hub instead.
Before:
20240822_112529.jpg
After:
20240822_135014.jpg
Taped for paint:
20240822_192624.jpg

He said that he missed a little bit bit of tape, and one of the boomerang spokes got nicked by the vapor blasting.
My response, "I doubt anyone would (or will) notice, and if they do, it's the Persian Flaw."
Y'all can see what it takes to tape off one of these pretty, but complicated rims.
It's a pain in the ass life experience to just clean one. Imagine taping one off not once, but TWICE in one day.
 
Last edited:
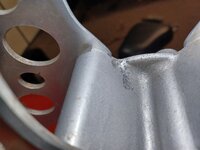
This is the "spot."
40 year old rim. Not going to worry about it.
40 years of tire changes have done more damage than this hiccup.
20240823_181121.jpg

Rim hub painted.
20240823_181234.jpg

20240823_181255.jpg
 
Real world problems.
Building a "doggio" (like a "catio" but for a dog) to keep a curious pup out of the work area, so that Larry can safely zinc plate the hardware.
20240825_192912.jpg

20240825_192931.jpg
 
Remember when I said, "bolt by bolt" . . .

"Well, I made more progress today than I expected. I checked in on the post and saw the picture of my beginnings of the fence/cage. So I took more pictures than normal if you want to show it. It'll take 2 emails though.

Table cleared and the system set up. The parts I do have cleaned are now over on the lift.

With that done I grabbed a few things and set up the muriatic acid and rinse bucket to strip the old plating and rust. About 15 minutes of that was followed up by dipping the container in acetone to remove the water and keep them from flash rusting and blowing them dry."

20240827_151501.jpg

20240827_151524.jpg

20240827_164617.jpg

20240827_165808.jpg
 
Last edited:
"After they were dried off, I took them to the .003" fine wire wheel and polished off the surfaces so they are clean and smooth. Makes a difference with the plating finish.

And just for mock up in the last picture, each and every part is wired up with copper wire in preparation for plating. After the strings of parts are ready, I need to go online to the Caswell web site and use two calculators, surface area and amperage, to establish the amperage needed for each string of parts and log each string on a numbered sheet I keep so I can check them off as each one is processed. Each string will be done with the specific color the parts needs. Black, yellow/gold, or clear silver, which is actually called blue. The colors are the chromate surface finish that protects the zinc from rapid decay.

That's the process that will be repeated over and over for what I'm thinking will be close to 200 fasteners/parts. I'll take shots of the actual plating and finished parts when I get some finished. I'm going to be acid cleaning more tomorrow so I have a lot of stuff to do when I get to the calculations and wiring up. Not sure if I'll be doing any plating tomorrow as all the above takes several hours just to get a batch of parts logged and ready. I usually get strings lined up and ready one day and start the plating the next day.

Damn, I'm getting all hyped up after just typing this all out! It's a choreographed dance to say the least!

BTW, the parts you see on the lift are only just the beginning. There's a lot more to do after these. When I get the frame and suspension assembled, I'll get into more for the rest of the bike. OOOHHH, then there's all the fasteners I need to plate that are holding the engine together!"

20240827_165741.jpg

20240827_171413.jpg

20240827_165823.jpg
 
Last edited:
Going the extra mile!!! :thumbup
 
"It's been a long day. I started the plating at 11am after the system
warmed up and was ready. While the parts I had already logged were being
plated, I did the measuring and calculations of the remaining parts. In
total, from start to finish, took 8 hours of attention to the dance of
the clock and each step of the process. Each string, and
multiple/doubled up strings took about 35 minutes from start to finish
before hanging to cure. But this FIRST batch of parts is finally
completed and with no issues during the process. 3 days in total if I'm
remembering correctly!

The first picture is of the log I keep as I go along with each strings
parts and amps needed after calculations. It shows which strings were
added together at the same time as well as the X showing it was
completed. The 2 shots are what I have completed today. Last picture is
of a few of the parts that came back today from Teflon coating. As
always, they did a great job!

I'm sure you know that this first batch is only the beginning! I will
likely be doing at least 3 more batches. Next up will consist of engine
long bolts, axles, and brake assembly parts. It will be the same de
greasing and sonic as before."

20240830_181157.jpg

20240830_184753.jpg

20240830_184801.jpg

20240830_191455.jpg
 
Damn... stuff looks great. Quite the effort :thumbup
 
where's pix of the doggo ?

excellent progress. such attention to detail
 
Back
Top