There is a third notch required because of overlap with the main side arms. This required even more trial and error to get it just right. Then paper templates were used to transfer the notch profile to each tube for repeatability. Then more test fitting and fine tuning of each tube for good fitment...
 20220104_150239
 by
andbike, on Flickr
 20220104_150350
 by
andbike, on Flickr
 20220104_152725
 by
andbike, on Flickr
 20220104_153218
 by
andbike, on Flickr
 20220104_152841
 by
andbike, on Flickr
 20220104_153545
 by
andbike, on Flickr
 20220104_162036
 by
andbike, on Flickr
 20220104_164406
 by
andbike, on Flickr
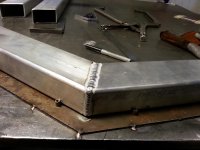
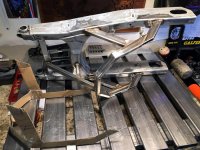
With all of the tubing cut, notched, and test fit, I could begin tack welding the first swingarm together. Not too fast though. The pivot tubes need to be fully welded since there would be weld joints covered by tubing and the top hoop needed an area welded that would be difficult to get to later in the process...
 20220104_170804
 by
andbike, on Flickr
 20220109_163013
 by
andbike, on Flickr
 20220104_170728
 by
andbike, on Flickr
Okay, now ready to clean everything including sanding off as much mill scale as possible, then ready to tack weld a swingarm together. Ya, this is a lot of work!
But worth it when it starts coming together

arty...
 20220108_122832
 by
andbike, on Flickr
So why is the swingarm in the fixture and in the back of my truck? Well, as mentioned earlier, this is going to be a mono-shock version of the swinagrm so it will need a bracket designed for the shock linkage to attach to. Easiest way to design the bracket is to model in CAD. Then print to paper and test fit to the swingarm. Since the bracket needs to not only fit to the swinagrm, but also locate to the correct location for the pivot, I would leave the swinagrm in the fixture witch has the locating riser for the pivot location in place.
So the swingarm and fixture come home together and paper templates are made. Again, lots of trial and error to get the fit as close as possible.
 20220108_161302
 by
andbike, on Flickr
A few days later back in the shop with the tacked together swinarm there are still the little vertical tubes to make. These are pretty straight forward. Rough cut, then notch each end, test fit, repeat...
 20220108_170805
 by
andbike, on Flickr
 20220109_143622
 by
andbike, on Flickr
 20220109_144513
 by
andbike, on Flickr
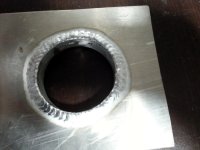
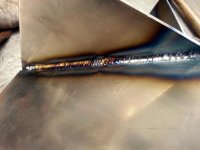
Don't forget, each tube needs a vent to the the outside world so that hot air doesn't cause pressure to build up and blow out during welding...
 20220109_152826
 by
andbike, on Flickr
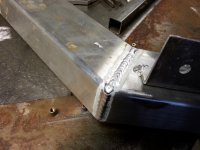
Finally the first gen2 swingarm tack welded together and looking good. I'm starting to really like how these swingarms are going to look. I also weighed one and its a few pounds lighter than the TZR250 swinarms I've been using. I still need to add the linkage bracket, so might be the same weight when done, but I'm okay with that. Just don't want it to be heavier.
 20220109_152850
 by
andbike, on Flickr
 20220109_162104
 by
andbike, on Flickr
Next installment I hope to have the linkage bracket installed and maybe get a test fit on the rolling chassis. So stay tuned!


 By far the best thread I've ever seen. You've got school years worth of knowledge in this post. There's fabrication techniques in here that most people will never attain let alone conceive. I am humbled and honored to be around for this. Your tube mitering skills alone, parallel some of the best builders I've seen. This is some legit work, yo! That Tony Doukas build looks gorgeous, btw.